As you know, Recently I published One Article on Good LightRoom Alternative to Edit RAW files For *FREE*.
First of all, Thank you each and every one for a good response to that article.
But If you’re still a Lightroom user, but Don’t want to spend money to Edit RAW files then you can prefer this article.
If you’re familiar with DarkTable then you must know that It’s not so simple software Like Lightroom.
This gives you Better UI/UX so you can easily set up all the editing tools and import/export options etc…
You need to edit so many images using DarkTable If you want to master it,
Now today, In this article I’m going to talk about one of the most common questions each and every photographer asks once he started editing using DarkTable.
and the question is How to Apple or Create Presets Using DarkTable?
If you’re one of them then within the next 2 minutes you’ll find the simple answer to save/create Presets using DarkTable.
Three Steps To Save Presets Using DarkTable
only three simple clicks need to press to create or save a DarkTable Preset.
before we start, firstly you need to roughly edit your images, so we can save something.
now here are simple steps which you need to follow to save presets after finishing your editing process…
Step 1. Go to the History panel. ( on darkRoom tab -> Left Side -> History Section ), It looks like this one…
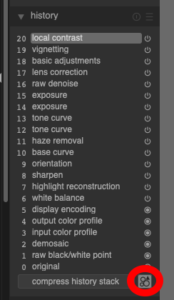 Step 2. Select that rounded button, which tells you that ‘Create a style from current history stack‘,
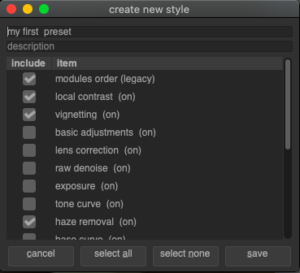
Step 3. now select all the required items, remove not required items like Rotate, Crop, etc, and save it.
That’s all you need to do, to create your own & very First DarkTable Preset.
now Let’s talk about the second part…
How To Apply DarkTable Preset?
Once you Created any preset, It’s quick and easy to Apply, let me tell you how…
the very first step is, to select the image which you want to Edit And Apply the existing Preset.
So at the bottom of your main image, you’ll see something like this…

Once you click on that button, you’ll see a list of presets, that you’ve created.
now just click on any one of these presets to apply existing edits, as simple as that.
That’s The simple and easy way that you can use to Create/Apply Presets using DarkTable.
Hope you guys learned something new today.
Read more about photography
- 7 Proven ways to earn money from photography
- 17+ Powerful tips to sell photos online and earn money | 2023 Ultimate Guide
- 71+ Nature Photography quotes & Caption for Photographers (With Images)
- Follow these tips to Become A Better Food Photographer | 6 Precious Tips
- Best short video editing apps ( supports 4k exporting for FREE )
- Photo Editing Tips to remember
Thank you, and have a good day 😀