


Without basic photo editing tips, there is no such thing as a professional photo. But why should a photo be professional anyway?
According to a study, people remember only 10% of information three days after hearing it.
Adding a picture can improve recall to 65%.
Nearly two-thirds of people say they’re visual learners. It’s human nature to prefer imagery and visuals.
Thus, it’s important for each and every photograph to appear professional.
If you want to make a good impression as a photographer, business, celebrity, influencer, anything – you must have professional photos.
However, photo editing may seem a daunting task for beginners.
Not to worry, as this article covers all the knowledge required to learn what photo editing is, along with photo editing tips for beginners to all advanced levels to edit your photographs like a pro!
now without talking more about stuff, let me share some important stuff related to photo editing.
which might helps you to edit your photos like a pro…
the very first question which every beginner is still asking is, why photo editing? what is the use of photo editing? so here you go…
here is the simple definition of photo editing and why you need to learn editing with one straightforward example…
What is Photo Editing?
In cinematic performances, actors and actresses wear makeup.
This makeup can act as an appearance enhancer, or an appearance changer to suit a particular role or costume.
Similarly, photo editing is the process of modifying digital images primarily to change the appearance of the image.
Digital image editing is the make-up done to a photo.
This change can be an improvement or just a modification.
It is done typically using specialized Image editing software such as Adobe Photoshop, Adobe Lightroom, GIMP, Corel Paintshop Pro, and many more.
Photo editing is a broad umbrella term as there are a wide variety of processes under it.
Some of these processes are adding drop shadows, color correcting, and image masking.
Digital photo editing is also often called photo editing, post-processing, image manipulation, photo retouching, photo enhancement, and image post-production.
Why Is Editing Important in Photography?
Before we discuss basic photo editing tips, let us explore why editing is important in the first place.
Editing is important in photography for a wide variety of reasons.
here are some of the important reasons ( according to me 😀 )
Technical importance
Before you submit your photo to any image hosting site.
there may be requirements for size, aspect ratio, and other technical parameters.
Editing can be done just to assure that these technical requirements are met before submission.
Personal importance
You may have a solo portrait or an old family photo that needs restoration.
Many people do photo editing for their personal photos as it adds more value to the photo.
Professional importance
Perhaps you are a public figure who’s trying to gain more viewership.
Before posting to social media, your images may require photo editing for them to look professional.
Thus, to appear more professional, photo editing is performed.
Business importance
For eCommerce sites and stores, photo editing is not a choice but a necessity.
To highlight the beauty of your products, photo editing must be done.
90% of online buyers say that photo quality is the most crucial factor in an online sale.
according to a study by Etsy. Thus, it’s no secret that photo editing is done to boost a business.
Creative importance
Photo editing can be done to make an image appear otherworldly, upside-down, or in any other creative form.
Digital artists and photographers often edit photos creatively.
Appearance
Although appearance falls under the category of personal and professional, certain photo editing can be done just to enhance human appearance.
In other instances, the editors’ focus may be to edit the photo as a whole.
But many people do photo editing solely to enhance the appearance of the people in the image.
Basic Photography Editing Tips For Photographers
Now that you’ve learned about what photo editing is and its importance.
let us discuss a few photo editing tips that are vital for photographers.
Choose the Correct Device
Different photo editing requirements will require different devices.

For example, you can do very minor editing on a smartphone editing application.
Some applications feature advanced high-quality editing as well, which is a great solution for editing on the go.
However, if you want to perform detailed, comprehensive editing, choosing a computer would be the best option.
Doesn’t matter what the operating system is as long as the technical configuration is good and it has a decent screen quality.
You can use either a laptop or a desktop, whichever is convenient.
Pairing a computer with a graphics tablet is also a great idea for high-fidelity editing.
A graphics tablet helps you edit with pinpoint precision, which is the choice of industry professionals.
Choose the Best Software Raw Filter
Most basic photo editing software has an integrated feature called the “Raw Filter”.
What this feature does can be labeled as pre-editing.
When you select a filter, it prepares your photo for further editing by applying some modifications and enhancements to the image.
Different filters provide different results.
In certain software, the Raw Filter also allows you to make quick adjustments before you begin editing.
This adjustment can be fixing the hue, white balance, or anything for that matter. Additionally, you can create your own filter and store it for future use.
Not all photos will require the software raw filter.
Regardless of how excellent or poor a photo is shot, the need for a software filter is up to the editor’s taste or the client’s requirements.
Filters are beneficial when editors do know how to properly utilize them. But if it looks good, don’t be afraid to put it on.
Crop and Resize for Better Composition
In photography and art school, “composition” is taught exclusively.
This sentence that you’re reading utilizes key elements of grammatical composition like subject-verb agreement, comprehension, etc.
Similarly, a photograph will look better once it adheres to the rules of visual composition.
The subject of your image may not be centered or maybe too centered.
Even without a subject, a widely scoped image may devalue focus for the central elements in the image.
Cropping and resizing helps you create the components needed for a photograph.
Not all images require composition. However, a basic composition must be met for all kinds of photos, for it to appeal to the human eyes.
Removing Unwanted Backgrounds

Background removal is one of the common eCommerce photo editing tricks.
It is also applicable to all kinds of photos, not just product photos.
There may be certain elements in a photograph’s background that can seem unpleasant in regards to the beauty of the photo.
Sometimes, the entire background itself may feel distracting.
Through specialized editing techniques, the background is removed and replaced with a better one to better suit the focal subjects of the image.
Even with a perfectly set up background, this photography editing tip applies.
Studio photoshoots often require background removal services, as the backdrops tend to have creases and lighting issues.
Cleaning the image by removing and replacing the background helps the image to stand out, regardless of whether it’s a photo of a model or product.
Brightness and Contrast
Brightness and Contrast are the barebones of basic photo editing.
Before delving into detailed editing parameters, ensure that the brightness and contrast of your image are as balanced as they could be.
Most images look better with a slightly increased brightness and contrast, by default.
However, if the photo is shot in a highly illuminated environment, you may need to reduce the brightness.
Contrast depends on other factors like the quality of the lens, angle of the lighting, etc.
here is a simple image with some differences in brightness & contrast.
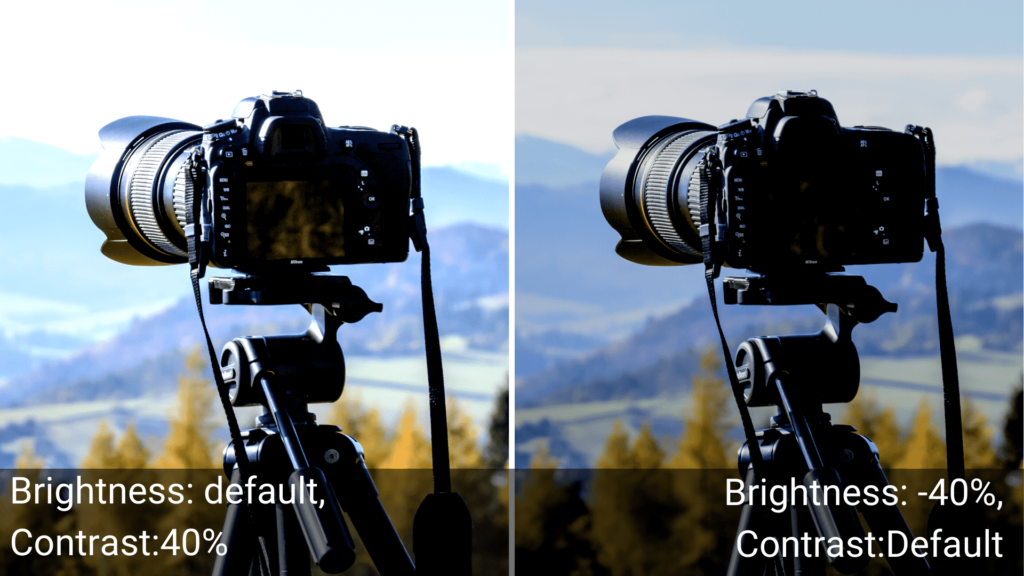
as you can see the default image which is already a bit overexposed, and the image after updating brightness and contrast.
Either way, play around with the brightness and contrast settings to find out the best result.
Never push any parameters to the extreme as that will damage your photo.
Color Balance, Vibrance, and Saturation

just editing simple photos using lightroom.
RGB(Red, Green, Blue) is the basic digital color spectrum.
A combination of RGB colors makes up for all the colors in a photo.
Color balance also referred to as RGB balance, is one of the integral photo editing techniques.
Each and every camera along with its lens will have a “bias”, no matter how small it is.
This bias makes the photo’s colors appear slightly different than it is perceived in real life through human eyes.
Color balance is a must-do to balance these colors and make the photo appear as realistic as possible.
You can do it to have the opposite effect – make the photo look completely unrealistic or dramatic.
Either way, adjusting the color balance should not be overlooked by any means!
Then comes Vibrance and Saturation. These parameters are often confused and rightfully so, as they’re very similar but not the same.
Vibrance adjustment is an increase or a decrease of all the low intensity or muted colors in a photograph.
If a photograph has very light and little amounts of red and blue in comparison to other colors, adjusting the vibrance will either increase or decrease the intensity of that red and blue.
Typically, vibrance is adjusted to bring out a bit more life in a photograph. It can also be done to dull out unwanted colors.
Saturation is the increase of all the colors in a photograph.
Adjusting the saturation increases or decreases the entire color spectrum of the photograph equally.
Increasing the saturation can bring all the colors into life, but it must be done with caution. Oversaturated images do look poor.
Color balance, vibrance, and saturation parameters have the best results when adjusted in parallel.
Meaning, you should adjust each parameter whilst also adjusting the other. That way, you can attain the most balanced results.
Create own presets
The entire chain of settings that we discussed in every tip can be stored as presets.
This is an excellent feature which you should utilize.
For a certain style of photo, you may be able to produce excellent results through detailed editing.
Should you have to do that all over again for the next photo?
Nope! Saving your presets will enable you to simply apply one preset to the photo and move on.
Better yet, you can tweak any parameters needed for a new photo on top of your preset.
Thus, always create and save your own presets to maximize your workflow.
Considering the Choice of Targeted Viewer
We saved the best tip for last.
This tip is not even about any editing technique. It’s about who will eventually be seeing your photo.
For commercial success, editing a photo solely according to your personal taste is a bad idea.
You must consider who you will be editing your photo for.
Is your image for an eCommerce business? Is your image for fashion magazines?
Demographics like eCommerce viewers have better success with very clean and polished editing.
Glamour or fashion viewers prefer highly stylized and beautified edits.
There are endless industries for which you may edit your photos.
Hence, always consider which style of editing has proven to be successful in your industry, whether it be real estate photography, landscape, wedding, or anything at all!
Grow your Own Style
As much as it’s important to consider your target viewer, don’t be scared to grow a style of your own!
You can edit photos according to the target market and still have your own flair present.
However, developing a style takes expertise.
After hours and hours of professional photo editing, you will gradually start to learn about your own preferences.
Focus on the quality and the target market and eventually, you will develop your own style. You mustn’t be hasty, neither should you be scared!
Editors tend to limit themselves from developing their own style in fear of going out of business.
After being an expert editor, developing your own style will not harm you but rather take your editing skills further.
FAQs
How do professionals edit photos?

Professional editors work in teams to maximize efficiency.
Meaning, there is a team to do composition and color correction, a team to do background removal and image masking, so on and so forth.
Some agencies don’t use separate teams but use one team to do everything.
Regardless, every professional photo editor is trained and highly specialized in their field.
Do Photographers Edit Their Photos?
Most photographers do some basic photo editing to their photos.
However, for a large bulk of photos, photographers outsource their editing work, whether it be basic or detailed editing.
What do professional photographers use to edit photos?
Professional photographers edit photos with the help of specialized software like Adobe Photoshop, Adobe Lightroom, GIMP, Corel Paintshop Pro, and many more.
How can I edit photos quickly?
You can edit photos quickly by outsourcing them to photo editing companies, especially if you’re editing in bulk.
However, for zero-cost solutions, you can use free web-based editing applications like Canva and Pixlr.
Final Verdict
There you have it! Now you can take your photography skills to the next level by learning these basic photo editing tips.
comment below your favorite photo editing tips ( if you’ve any 😀 ) & Don’t forget to share!


1 Comment