photography is austere and blazing poetry of the real.” –Ansel Adams.
One of the things that make photographs obnoxious is softness.
Photographs reflect memories, talents, and real beauty through photography, and softness destroys a major chunk of happiness a viewer gets from the photograph.
It is very disappointing when you take a photograph of a special moment and that comes out to be unclear/blurry/soft.
This article can be quite useful for solving your problem and helps you to capture sharp photos with some pro and editing tips.
Let’s start with the reason which might make your photographs sharp.
Movement
Either the camera or the subject is in motion and this is the most common reason for image softness.
here is a simple and straightforward solution to resolve this issue.
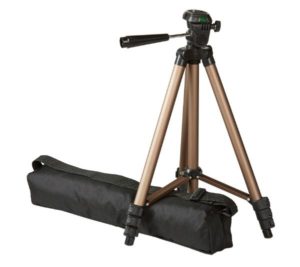
you can buy & use a tripod, it can help you achieve the stable result which you’re looking for.
Long shutter speed
A long shutter speed can capture a sharp photo, errors, and may produce something which isn`t useful.
Solution of long shutter speed
Turn the camera’s mode dial to manual or bulb shooting mode and use a slow shutter speed for a longer exposure. make sure your shutter speed is at least 1/125
Bad lenses
Bad/poor lens that is not capable of producing sharp images might be a reason
Solution for bad lens
In case your lens is too old just replacing them with new ones can work but maybe sometimes getting them repaired is all it needs
Poor focus acquisition
Shooting photographs out of focus or focusing on the wrong part of the subject for instance while the bokeh effect you are not getting the desired results due to focusing issues
Solution for poor focus
Maybe your lens needs to be calibrated or maybe your faulty AF sensors need to be reset and the most common reason is wrong AF mode might need a correction.
ISO problem
Your ISO could be set to a very high number, resulting in lots of noise and loss of detail.

Solution for your ISO problem
Start with setting your camera to the lowest ISO “base” value. The camera base ISO will produce the highest quality images with maximum sharpness
Few Important tips to capture sharp photos
here are some of the best and very important tips which you need to remember to capture sharp photos without any problem.
Sharp Aperture

When you shoot with a wide f-stop it means that less of your image will be in focus.
Most lenses are sharpest between f/5.6 and f/8.
in case you are shooting in sun try setting your aperture to f/4 and f/8 and in case you are shooting at night, the ideal aperture is f/2 or /f4.
Your choice of aperture should be based on factors such as achieving an acceptable shutter speed and depth of field.
Tip: try to stay close to the optimum aperture for a perfect picture that appeals to everyone.
Remove Lens Filters
Filters tarnish the sharpness of your lens thereby affecting the final image quality. When they`re not needed just avoid them to improve clarity.
Use a mirror lock-up
The mirror in front of the sensor is another alternate vibration problem for instance when you press the shutter button.
it flicks up out of the way, and this can cause the camera to move slightly.
mirror lock can help you in this, it holds the mirror in its retracted position so that when you take the shot it doesn’t need to move. most digital SLRs have this feature
Shoot In Burst Mode
Switch your camera to burst shooting which will continuously take several shots at a time ( my go-to way to capture sharp photos using a smartphone ).
usually, when you take 10 or more shots at a time at least 3-4 comes with sharpness
tip: make sure you carry a big memory card because. this method takes a lot of space.
Turn Image Stabilisation On
This is tempting when you are holding your camera, in optimum conditions, this can give you as much as 3 stops of exposure which can make the picture crystal clear and tack sharp.
Use the hand-holding rule
If you have a zoom lens beyond 100mm then the hand-holding rule would work for you which states that the shutter speed should be equivalent to the focal length set on the lens, or faster.
For example, if you have your lens zoomed at 125mm, your shutter speed should be 1/125.
now let me share some awesome and very important ways to make your photo more sharp using photoshop and similar tools.
Sharpening Images By Photoshop

Sometimes no matter how much you try few vibrations cause errors while shooting but the spectacular part is still most photographs can be made clear by using graphic programming usually we call it photoshop.
I swear photoshop is a game-changer ( really helps to create sharp photos).
it’s the photographer’s favorite magic tool for improving sharpness.
The unsharp mask and smart sharpen this works by increasing contrast along the edges in your image.
You might be wondering how you’re supposed to do that. But you need not worry I will explain to you how.
How to sharpen an image in photoshop
These tools help you increase the contrast along the edges and don’t increase noise.
here are my favorite 4 ways to sharpen your images using photoshop…
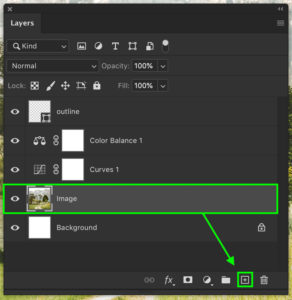
Duplicate
Open the image you want to photoshop and right-click on the background layer and select the duplicate layer.
source: bwillcreative
The sharpening will be applied to the duplicate layer we created to avoid the alteration and photoshop of the original image.
The new image will pop up after you click ok, the new layer we just created will flash on top of the original image.
Now the new layer should be put on blend mode “luminosity” to prevent color fringe.
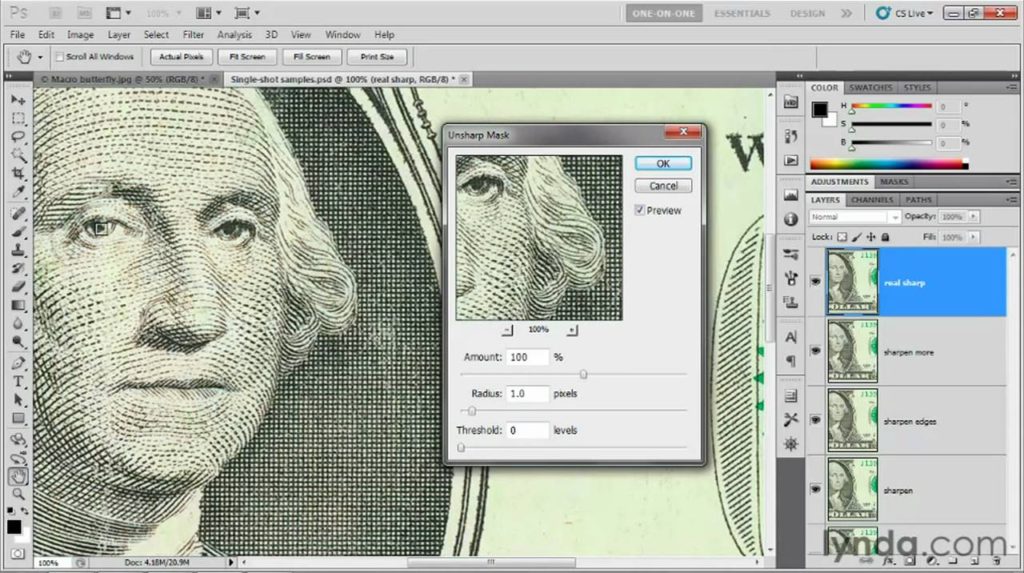
Applying sharpening to the image
For this, the image has to be zoomed to 100%.
Then the filter has to be selected as an “unsharp mask”.
Then the unsharp mask window will pop up.
For initial clarity of the image, parts to be edited, select the Preview option to get a fair idea of what parts need to be sharpened.
You will be able to see the preview thumbnail and the photo working area.
source: ytimg
The Amount slider is exactly something that will help you to set the sharpening level.
Usually, any image needs 50-70 % sharpness to get screen viewing spectacular capacity whereas if you want to make large prints it will be depending on you.
The radius reflects the number of pixels around the edges that will certainly affect the sharpening.
The radius selection is one of the critical things which has a huge impact on photoshop therefore until would suggest a 1-2 radius value for the usual image
Now the threshold slider is to reduce the posterization and color changes until you are not using a high amount of sharpening prefer leaving this slider at zero
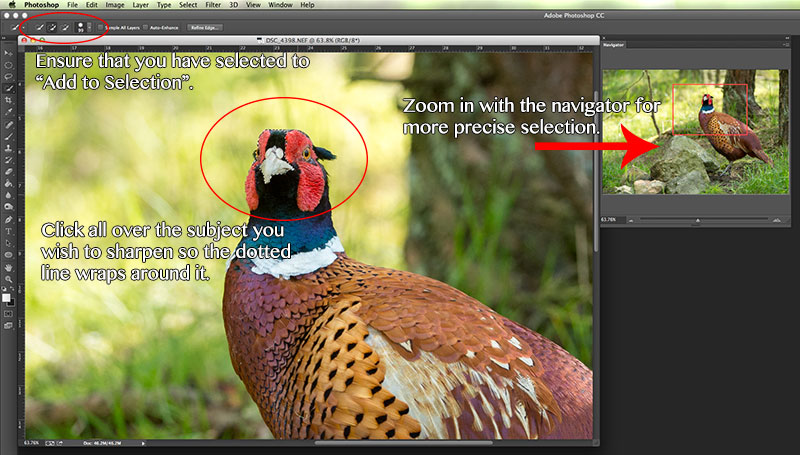
Selective Sharpening
Selective sharpening is used for the selective area of the entire image.
for instance, you want to sharpen the smile of the person in an image or ears or maybe eyes then this technique is the most suitable one for you.
Select the image layer on the layers panel and draw a selection using selection tools.
This method will help you to refine the edges.
To avoid a distinction between sharp and unsharp parts you need to right-click on the selection and choose the refine edges option which will help to reduce the clarity of sharp and unsharp.
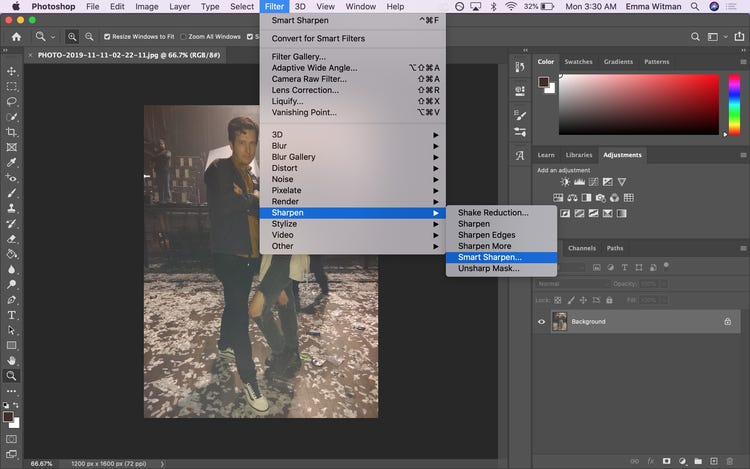
Apply the unsharp mask for this go to the filter>sharpen and select.
source: naturettl.com
After adjusting the options, now click Ok. This will make the selected areas sharpened and enhance the beauty of the image in the similar way you wanted
Use the sharpen tool for quick Results
Go to the Tools panel and select the sharpen tool.
source: insider
Adjust the brush in the options bar, as you want you can alter its type, size and strength, and color I would prefer the hardness low to avoid rough line around the sharpened area of the image
Go to the Layers panel and select the top layer, drag the brush over the areas of the image you want to make sharper.
If the sharpening is not visible then try increasing the strength of your brush and paint the desired area
After all this hopefully you will get desired results and mastery to create/capture sharp photos.
The beauty of the photograph remains in the hand of the photographer.
you should try to capture the moment as perfectly as you can.
Some photographs mean a world to some people and sometimes they make a world too.
That’s all from my side, hope you find some interesting ways to capture sharp photos using your photography skills.
if you like this article then make sure you share it with your other photography friends 🙂