As a photographer, it’s always better to visualize each scenario in your mind before you actually start shooting.
And sometimes to capture some great shots, all you need to do is remember some cool concepts like vanishing points.
No matter if you like art or photography, the vanishing point is one of the best concepts which you can learn and understand to get /create/capture something beautiful.
In this article, I’m sharing some of the most important notes related to the vanishing points including vanishing points examples and composition techniques.
Which you can apply during your photoshoot to create something remarkable.
In this article, you’ll find some important tips like what is the meaning of vanishing point in photography? The importance of vanishing points along with some popular photo composition techniques with proper examples and many more…
So now without talking more about it, let me share some quick & important details about vanishing points…
What Is A Vanishing Point?
So here’s the simplest definition of the vanishing point in art/photography.
A vanishing point is an optical illusion caused by the converging point on the horizon line in an image where parallel lines converge to provide an illusion of eternal depth.
Vanishing points originated from paintings.
It is an extraordinary illusion to give depth to a scene.
It can add a three-dimensional feel to a two-dimensional photograph.
It is a spectacular way to guide the viewer’s eyes to an element in the frame.
The vanishing optical illusion happens because things look smaller and smaller as they get further away until they seem like a single infinite point.
This point can also add mystery, and symbolism to your images.
A path or road that disappears in the distance can symbolize a fantastic never-ending journey.
Types of perspective
So here are some types of perspectives that you can remember and can apply to draw attention to your subject.
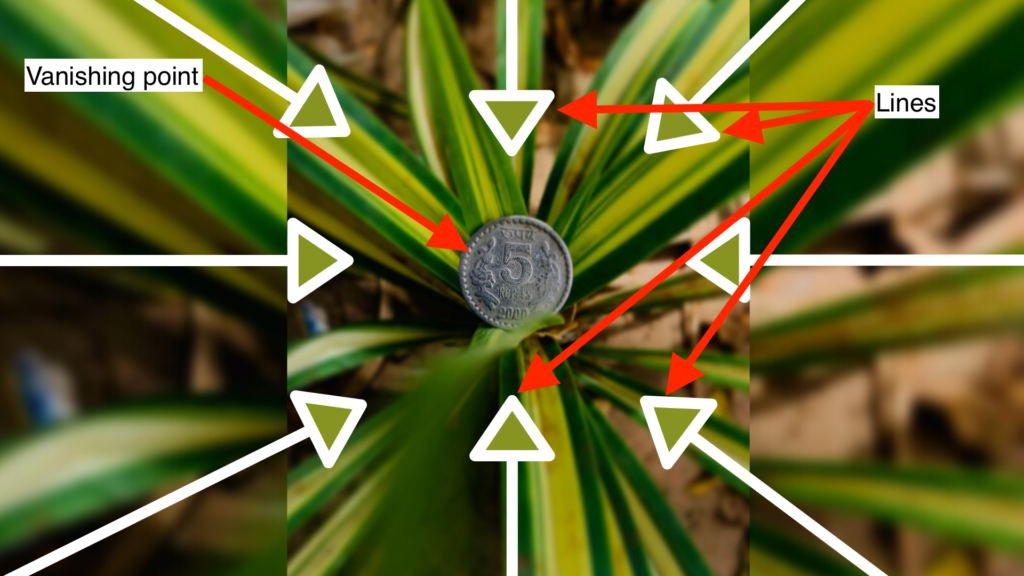
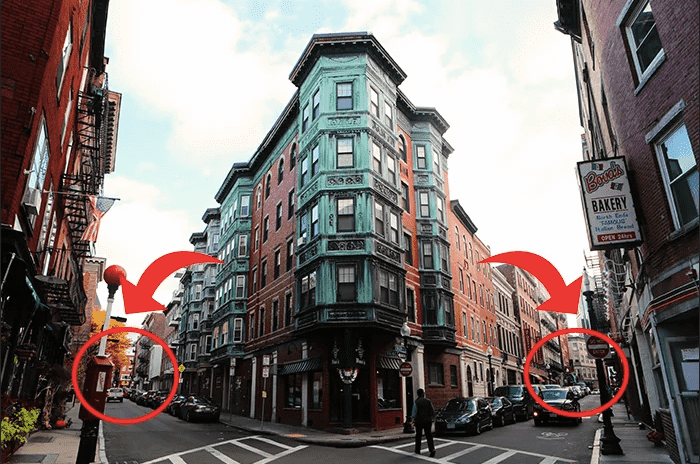
One-point perspective
The one-point perspective is the parallel horizontal perspective.
Vertical lines seem to converge at a single vanishing point towards the centre.
Here’s one simple example of a one-point perspective that includes vanishing points and lines to draw the user’s attention to the subject. (shot on iPhone)
Know more about One Point Perspective in detail.
Two-point perspective
In this, the image is bifurcated in which both sides have their respective perspective.
While the straight lines usually bend towards a vanishing point near the side they originated from.
Source: expertphotography
Check out the In-depth definition of the point perspective.
Three-point perspective
These straight lines converge at three different vanishing points usually placed by the artist at the edges of the two-dimensional surface on which their image has been composed.

Photo by Sean Whelan on Unsplash
Three point perspective uses three sets of orthogonal lines and three vanishing points to draw an object. – artyfactory
After seeing the original example of three-point perspective, I’m pretty sure then now you know something about it.
Now let’s understand some important ways to add vanishing points in your photos using some existing methods…
How To Capture The Vanishing Point In Photography?
So here are some tips for using vanishing points to create an astonishing illusion in photography or in any sort of art.
Use creative methods to find a perfect angle
Some of my readers ask me how to find vanishing points? So to answer that searching for Vanishing points is not so difficult.
Therefore, to make it possible, you have to acknowledge some well-known examples we studied in middle school.
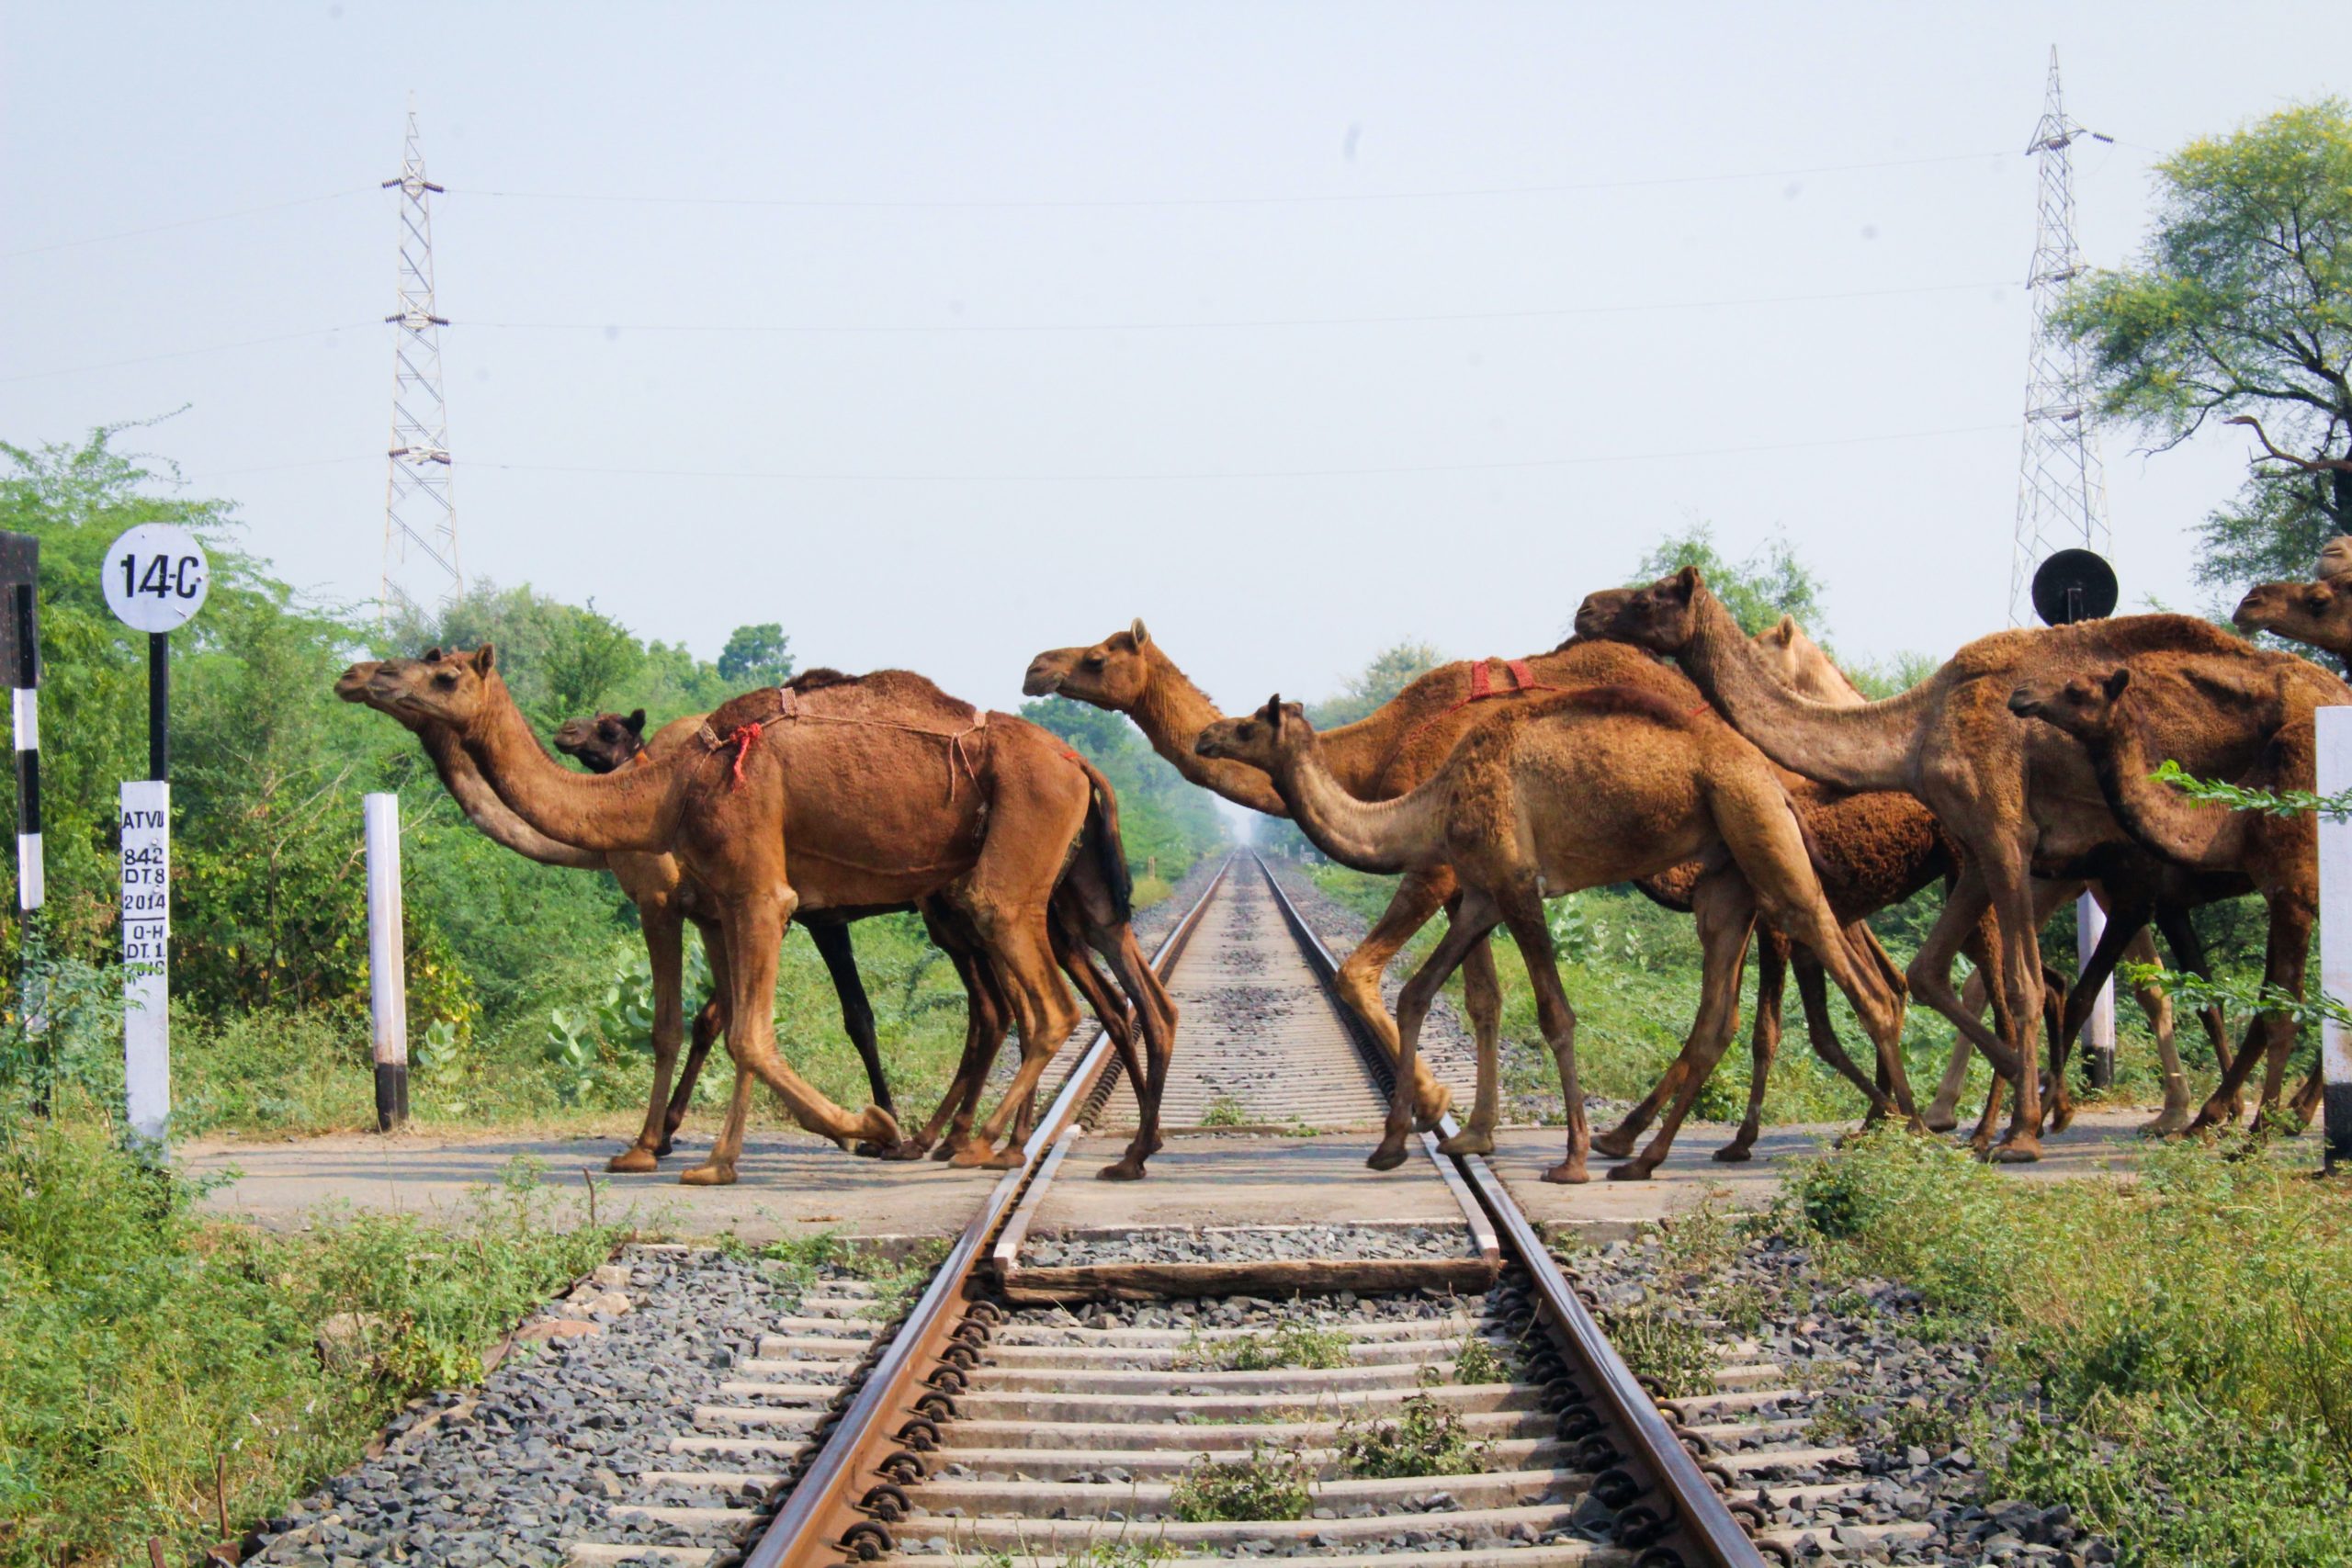
For instance, railway tracks converge as they approach the horizon.
As you can see in this image…
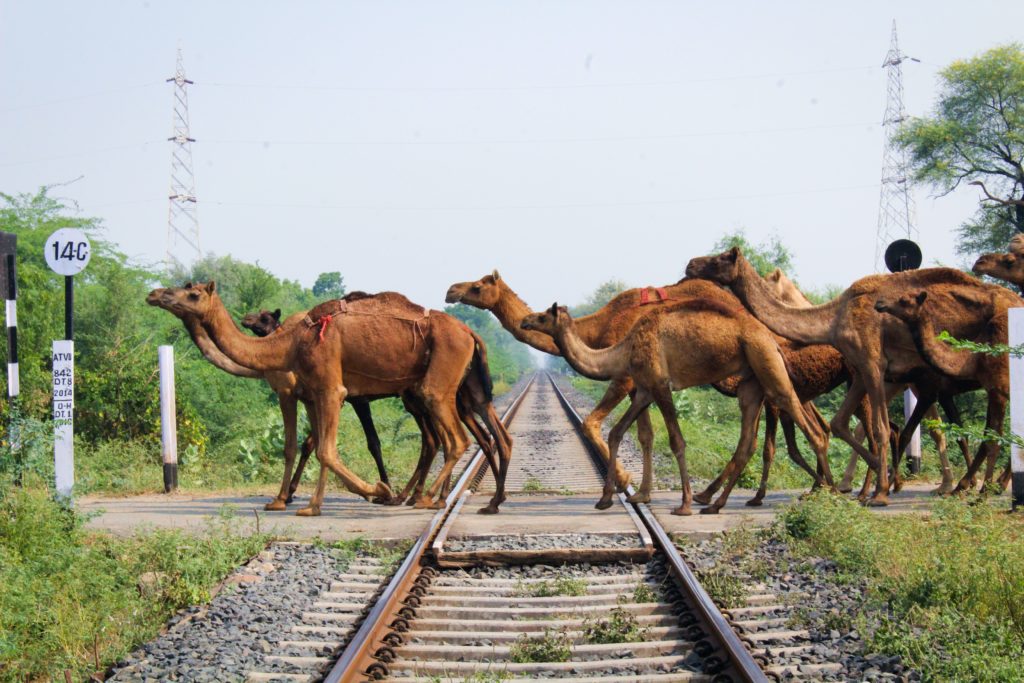
Captured using Canon 1300D
I captured this image while travelling with my family, and it’s super cool, right?
Believe me, It’s quite easy to find/create vanishing points.
However, you need to use your skills and drag out a perfect vanishing view in your photography.
But regardless of where you are shooting, your creativity can help you figure out a vanishing point for your photography.
You don’t have to limit yourself to horizontal formats only.
Nevertheless, you can turn your camera on its side and shoot a vertical image.
This vertical capturing of vanishing points can help you capture skyscrapers or towers and other tall buildings with the sky as their vanishing point.
Search For Parallel Lines
Landscape, architecture, and street photography are the best areas to use vanishing points.
You need to start with the evident space where you think you can find a vanishing point that is commonly used.
For instance, bridges, train tracks, rows of trees, roads, and two rivers can make mind-blowing clicks.
Therefore, you can start from key points, and then you can show your creativity there.
Try Different Compositional Guides
There are many tricks that photographers use along the way to help them get mind-boggling results.
Here are some tricks or you can say composition techniques, which you can also apply to get better results…
The Rule Of Thirds
The rule of thirds has bifurcated the frame into nine sectors using two vertical lines and two horizontal ones.
This intersection of lines gives the photographer an idea where to place key elements.
This rule works because it helps you visualize how the viewers will perceive your captured art.
This helps you to create a static image.
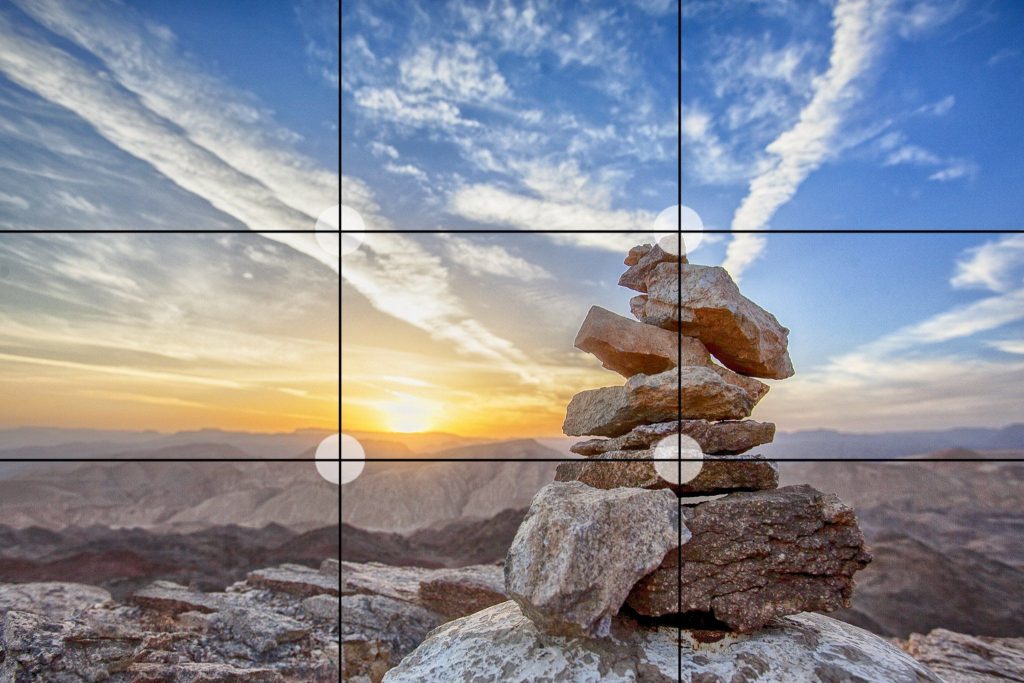
Besides, the subject has consolidated. Whereas, the spectator’s eyes settle on the main elements of the photograph.
To apply this rule to the vanishing point, remember that the central vanishing point is not essential.
Try putting your point off at one-third line’s intersections; besides, try to stop it near one of the horizontal lines.
If you want to know more about the Rule of thirds then make sure you check out our article on Learn Rule Of Thirds In Photography Under 5 Minutes.
Golden Spiral
The golden spiral pattern has emanated from a recurring mathematical pattern discovered in nature thus, known as the Fibonacci sequence.
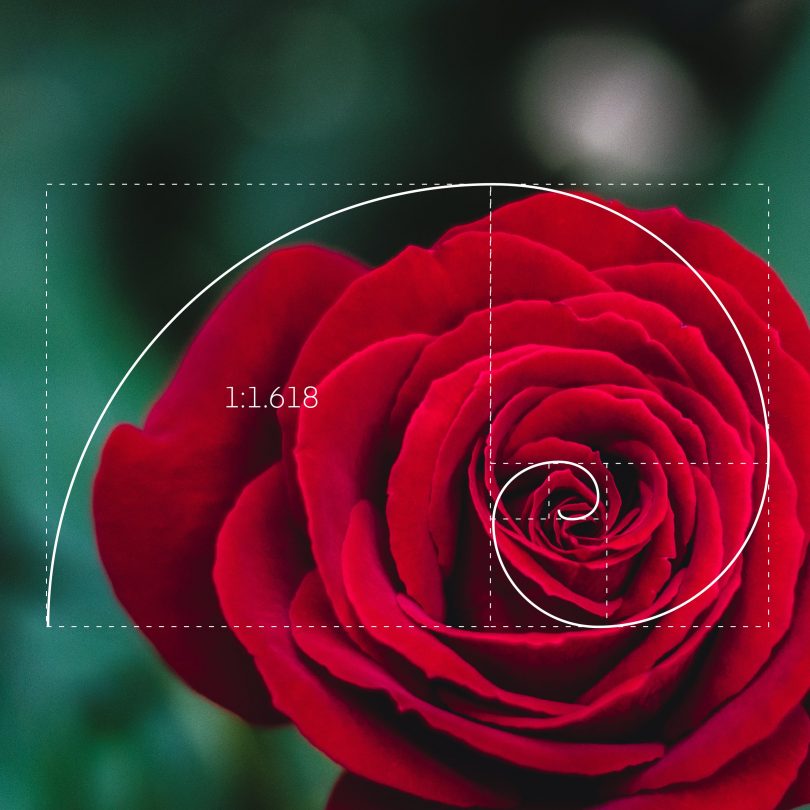
Source: invisionapp
You must strive to visualize a spiral that starts wide at the edge of the photo and progressively gets smaller towards a focal point.
It is useful in vanishing point photography as it centres on a distant point.
Shells, famous paintings of the Mona Lisa, hurricanes, seed heads, and flower petals are a few examples of golden spirals found in nature.
Many famous photographers used it in their work, for instance, Ansel Adams used it often in his landscape photography.
You can try to shoot from a lower camera height to increase the level of convergence
You can try changing the level of convergence by shooting from a lower heightened camera which can help you to get a greater level of convergence.
Too low shoots can merge the elements and may ruin the image.
Besides, too high can seclude everything.
Therefore, you have to ensure to use it appropriately for capturing and get the correct length.
Focal Point
Once you have identified a vanishing point for your photography, you can use a focal point to draw the spectator’s attention to your desired spot in the image.
That can end up giving magical effects to your photograph. Remember to use the focal point in the necessary case only.
Try using depth of the field
The Depth of the field can be utilized, adjusting the vanishing point.
It can help to fix the vanishing spot in terms of focus or out of focus
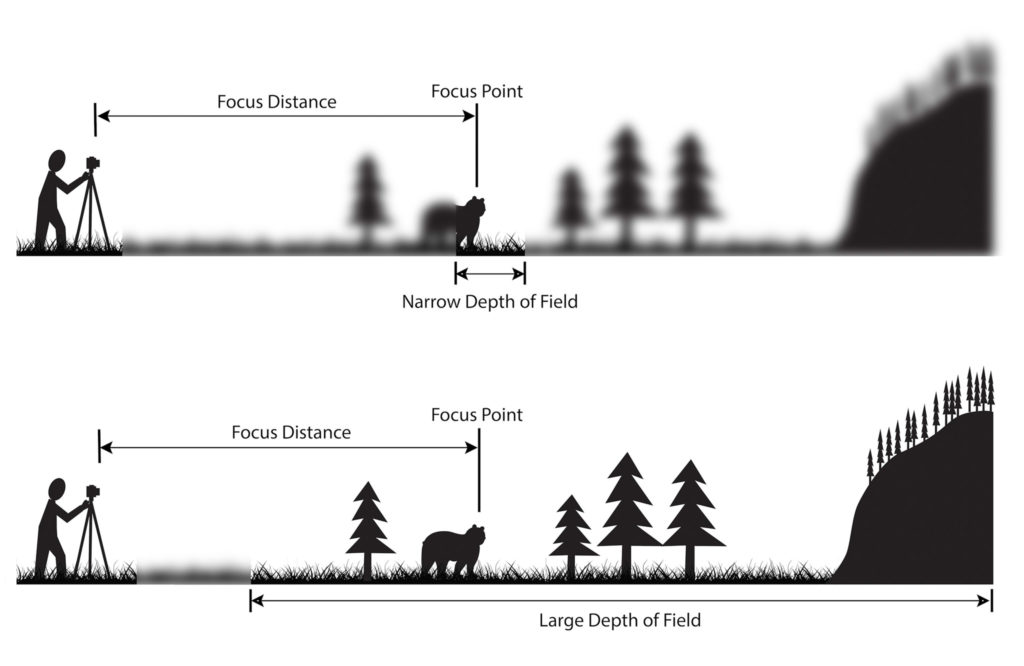
It can give a mind-boggling effect while placing the vanishing spot out of focus as a perspective drawing.
Which will give the image a greater sense of deepness.
Use a wide-angle
Exaggerating the distance can add some astonishing effects to your image.
For that, you must use a wide-angle lens that will make close subjects look compact and, besides, it will give an effect at bay.
Do not forget to consider leading lines to start foregrounding, which will help you to maximize the effect of wide-lens.
If results are not worthwhile you try zooming out the image a bit to get better results.
Moreover, you can adjust effects as you wish.
Do not ignore the theme
You have to concentrate on the desirable idea that you want to reflect on the viewer.
Focusing on the main idea is very important as it guides you through your path in photography.
Moreover, it will let you know what effects you need to add to create that particular tone.
In case you want your image to look dramatic, dark, gloomy, and be-witching.
An experiment is a key to the Success
After going through all the steps and ending up with multiple perfect clicks.
By initiating different things and experimenting a little with your work, you never know what you can find subsequently of your creativity with different vanishing point placements.
So always try something different and unique, without expecting a great outcome.
At the end of the day, you’ll learn something new 🙂
Important Points To Remember
You will need a sizable depth of field for sharpness.
Make sure you select the aperture around f11 or f16, which would ultimately help you get good results.
That aperture count will help you to keep both foreground and background in focus.
Do not forget to pay attention to the area of focus to make the most of the one-point perspective.
Try using hyperfocal distance, which is the closest focusing distance where elements at infinity still have more than enough sharpness for a clear view.
All you need to do is experiment and creativity with your work and just find out what works for photograph nicely.
Using Vanishing Points In Photography – Conclusion
Now I hope you’re aware of the real meaning and use of vanishing points in Photography.
No matter if you’re an artist, this little art will help you to catch something outstanding.
You can even apply some good perspective techniques which we discussed earlier to get better results.
In the end, you’ll end up with something unknown but beautiful result.
So make sure you correctly apply this art & archive something outstanding.
As you know the overall process of learning and understanding vanishing points using different composition techniques is quite boring and time-consuming.
But once you know the basics, it’s very easy for you to analyze each situation to get better results.
May you like
- Learn How To Take Amazing Long Exposure Images On Your Phone
- 7 Proven & Unique Ways to Earn As Photographer
- Tips to capture sharp photos | 4 ways to get clear images using Photoshop
That’s all from my side, make sure you share this article with your other artist friends 🙂
Which one is your favourite/go-to Composition technique to capture better images?