If you have just bought a new DSLR camera and are looking for some serious answers to questions like “What is aperture?” and “How to master aperture quickly?”, then your wait is over now.
Today, in this article I am talking about aperture and how to use it with your existing or future camera lens.
So if you don’t know anything about aperture and how it works and want to understand aperture then this is the real content that you need.
Afterwards, you can start capturing some amazing images with your new or old DSLR camera using aperture.
I created this article for all types of photographers, no matter if you’re an amateur or intermediate you need to learn and understand the aperture.
Aperture is a very important thing for you if you want to become a PRO in your photography career.
This little feature in your camera helps you capture images in almost every situation.
No matter if there is low light, or even if you like to capture a landscape or bokeh kind of photos with your very first DSLR camera.
Also if you want to capture images using Manual mode then you must learn and understand the aperture as soon as possible.
This article helps you with some simple steps to master aperture and tells you some real answers to questions like “What does aperture do?”.
So, without talking more about it, let’s get started and become a PRO…
4 Easy Steps To Understand Aperture Quickly
Here are some easy steps that help you to learn aperture easily…
1. What is Aperture & how it works ??
Yeah, I know you’re here to know the answer to this question.
Do not worry this paragraph definitely helps you to learn what is aperture quickly.
So basically the aperture is expressed in F Numbers or F stops.
Now, the question is what is F-Number or F stops ??
So this thing describes how wide your lens is open.
You can find the aperture of your lens here…
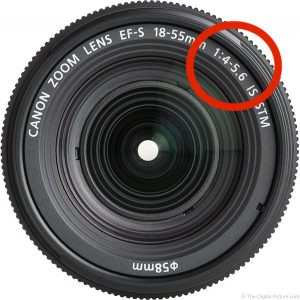
This is a basic 18-55mm kit lens, which you get with your default DSLR camera kit.
As you can see from this image when you zoom out your lens the fullest aperture is 4F or f/3.5 and when you zoom in your lens the widest aperture is f/5.6.
Small F-Stops like 1.4F and 0.9F are much higher in price than this one.
- Amazon’s Sharpest e-mount Lens under $200 | In-depth review
- checkout my new lens review: Sigma 56mm F1.4
Let’s back to the main point, when you set an F-Stop minimum of 1.4F that means a large aperture ( so your lens is wide open ).
And if F-Stop is like F16 then it means it’s a small aperture ( less open lens ), as simple as that.
That’s the basic meaning of aperture.
Now let’s talk about how aperture works…
So when you set F-Stop to a minimum like 1.4F or 4F then as we said earlier the lens is open wide means more lights come inside the sensor.
This simply means that it’s better to use it in a low-light condition where your object is looking for more light.
And when your F-Stop is as high as 16-22F means less open lens ( small hole ), and the sensor gets a very small amount of light.
There are so many other important things that you need to understand and learn to improve your photography performance.
If you still don’t get how much aperture your lens contains then you can easily switch manual mode and see the maximum and minimum F-Stops.
2. Direct Connection With The Depth Of Field
Yes, this is a very important thing which you need to know about aperture.
If you learn aperture then it’s very easy for you to master ISO, DOF, and shutter speed.
See how DoF comes into play when you shoot with different apertures…
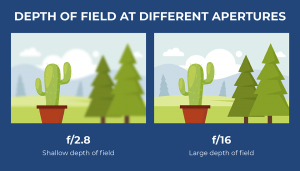
resource: photography life
If you shoot images using Large F-Stop like F16 then it makes everything in focus.
And if you shoot images using small F-Stops like F1.4 then it’ll make the background blurry which is also called a shallow depth of field.
3. Best Mode To Express Aperture
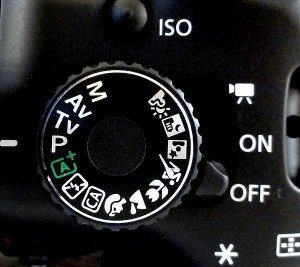
If you’re excited and ready to shoot images using aperture then which mode you select is very important.
There is a total of two different kinds of modes you can use to shoot using aperture.
- Manual Mode
- Aperture Priority Mode
I normally capture images in manual mode, because I can set everything by myself.
No matter its Aperture, ISO, shutter speed, or even RAW or JPEG image format.
But if you’re a beginner and don’t know how to shoot images using aperture then you can choose another option.
Using aperture priority mode you don’t need to manage all other stuff, just manage the aperture that’s it.
Every other thing like ISO, shutter speed, etc managed automatically.
Just remember this simple thing…
if you want a blurry background, then try to capture images in Small F-Stops (in between 1.4-4F ).
If you want to capture images faster then buy a lens that contains a maximum aperture number like 1.4F, and that’s the main reason why this kind of lens is expensive.
4. When You Need To Use Aperture??
Here are some best ways to apply your aperture magic…
These examples help every single beginner to learn aperture quickly.
if there is low light…
As I said earlier, you can set your aperture between f/1.4-3.5.
That simply means your lens is wide open, and to capture images in low light then you need more lights to come inside your camera sensor.
So using the combination of aperture and shutter speed you can easily capture long-exposure (night photography ) kind of images…
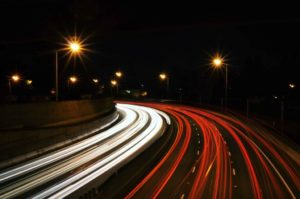
if you love landscape photography and want to capture good landscape shots then the manual mode is the best option.
Using this mode you can easily set the aperture to F22 and make everything in focus.
as we know, F-stop like 1.4-4F makes your object clearer and sharper which means it makes the background blur.
That gives you a very good bokeh effect.
Hope you guys now know why the aperture is very important & popular, the main AIM of this article is to understand the aperture.
May you like
- 7 Best Short Video Apps To Edit Your Videos Like A Pro
- 7 Proven & Unique Ways to Earn As Photographer
if you like it then please share it and like it, thank you have a nice day 🙂

 FREE Guide Revealed!
 Don't Miss Out The Opportunity To Earn as Photographer in this year :)