During our school time, our teachers used to tell us that the math we used to study would help us in the future.
Back then we never paid attention to them or just laugh at them. But as a grown-up, you can see that they were right.
Despite what you thought about math in high school, it is used in day-to-day life in the real world.
Almost every field out there whether it be freelance or professional uses math to an extent. These fields include photography too.
Photographers use mathematical calculations while using several settings in their cameras. Some of these settings include shutter speed, aperture and focal length.
There are countless rules in photography that use math in improving the picture. One such rule is The rule of thirds.
it can help you compose your picture more efficiently.
Not only math but science too plays an important role in photography. The equipment you use in photography is made with the help of science.
But let’s focus on math for now to improve photography. There are numbers used everywhere in photography whether it be shutter speed or even focus.
Let us explore the use of math in photography more closely.
How Is Maths Used In Photography?
Photo by Michal Matlon on Unsplash
so here’s the very first question, why math in photography? dose it really improve your skills as a photographer??
There is no rule that to improve your photography skills you need math, you can do great without it.
Cameras nowadays come with so much technology that they do everything for you so you can take a good picture without knowing any math.
But it’s always better to know your technical stuff if you want to make a living out of it. You will notice that the best photographers in the business have a heightened understanding of light.
They know how the light falls off, bounces, ratios of darks and lights, etc, so a good understanding of math makes the job much easier.
Even if you are a hobby photographer you don’t need to know about maths in photography. But on the other side, if you want to make a business of photography, you need math skills.
Now let’s get back to the topic of how to use maths to improve your photography skills.
There are many ways to apply math and improve your photography performance.
Maths is used in multiple settings and even to decide the angle from which to capture the pictures.
There are even some calculations involved in some filters and camera settings.
Using math you can choose the correct way to click the pictures with the right settings as well as the environment.
Using mathematics in your photography can help you improve your work as well as your skills with practice.
what is the use of maths in photography?
There are many uses of maths in photography.
First and the most important as well as the most fundamental use of maths is in the manufacture of equipment.
In the manufacture of almost all pieces of equipment, a lot of calculations are done to get a satisfactory result.
There is a lot of trial and error involved in the whole process.
A lot of different mathematical concepts are involved in photography, one of them is the most basic of them all, fractions.
Numbers play an important role in photography, if you notice you will see that in almost every setting there is either use of a number or fractions.
Not only in camera settings there are fractions involved in getting a proper photo composition.
Easy Example to Use Maths in Photography…
you can pick a very popular composition rule called The Rule of thirds.
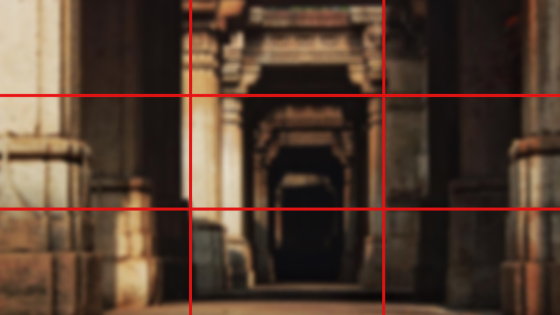
so basically, If we divide our photo into thirds, we can get a grid with dimensions 3×3 – 3 vertical and three horizontal thirds.
This way we can get a total of 9 rectangles, this rule can also be called The Rule of Thirds.
The main idea behind this uses the lines to position the important subjects in the photo at the places where those lines intersect.
Thankfully, most of the digital cameras available today with an LCD have the option to turn the grid on, so you can pretty much use fractions to your advantage.
The great thing about these lines is that you can position their intersection point at any subject or part of the subject you want.
It is used in various other places, some of which include exposure, optics, perspective and most especially buried in the software used in the camera and post-processing.
Someday if you go into the inner workings of various features you will see that every setting uses a different formula we just don’t know it because we just see what the setting does not how it is done in the camera.
The more you understand about photos and the underlying foundation of everything that goes into creating an image, the more likely you will be able to control the resulting image.
Some other points where math is essential in photography are mentioned below…
now let’s understand each point in detail…
ISO setting
First of all, let’s see what an ISO setting is.
It is one of the most important settings in photography. ISO setting has a major effect on your photograph.
In basic words, ISO is the camera setting that can lighten or darken your photograph.
Using the ISO setting you can click a picture in a darker environment. But sometimes brightening the photos excessively using ISO can result in grains or noise in the photos.
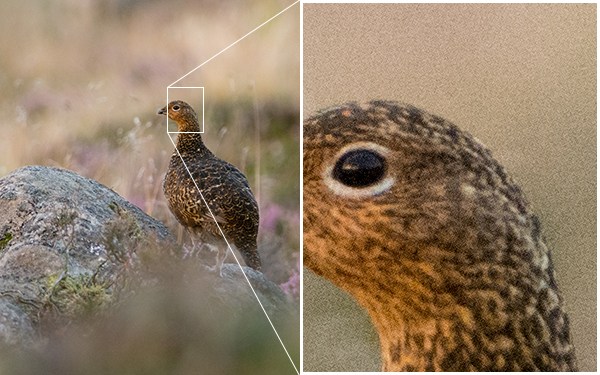
ISO can also increase or decrease the grains or noise depending on its value. If you look at it from a different point of view ISO is a direct measure of the camera’s sensitivity to light.
When the camera ISO settings are high it is more sensitive to light and when it is less, they are less sensitive to light.
In every camera, there is a base ISO setting which is the lowest. If you stick to always using the lowest ISO you can get the highest quality of photos.
If you take a look at the most common ISO values you will notice a pattern.
ISO 100, 200, 400, 800, and 1600 are the most common ISO values in a camera. You will notice a geometric progression if you carefully see it.
The first one of these settings is known as the Base ISO. The further settings progress higher from the base value itself.
There are many different cameras with a lot of different base ISO available in the market.
Some of the base ISO is 50,100, and 200.
Sometimes you can notice that a photo at ISO 400 will be twice brighter as ISO 200, which will be twice brighter as ISO 100.
Aperture
Aperture in photography is believed to work as the pupil of a human eye does.
It expands and shrinks to allow more or less light through to a camera’s sensor. The larger the aperture, the more light comes in, which results in a brighter photo. If the aperture is smaller, less light enters, and the image captured will turn out to be darker.
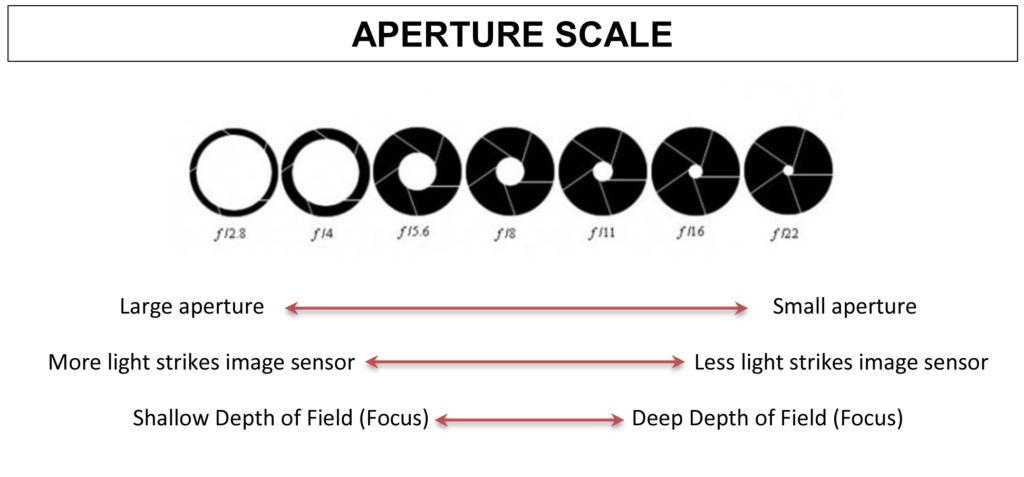
There is a common misconception that a higher number results in a larger opening but in reality, it’s quite the opposite.
In aperture settings, a low number means a large aperture and lets in more light. Similarly, a higher number means a small aperture and less light is let in.
The aperture is displayed in a “f/number” format.
The letter ‘f’ next to each number in the aperture setting is a symbol for F-Stop.
If you look at the numbers closely in the aperture setting you will notice a geometric progression. This geometric progression is different from that of the ISO settings.
This geometric progression follows a doubling pattern. The typical aperture settings are f/1.4, f/2, f/2.8, f/4, f/6, and f/8.
The aperture number decides how much the lens will open and how much light will be let in the lens.
For example, an f/4 on a 50mm has a smaller opening than an f/4 on a 200mm.
Hence, When you increase the aperture, the radius also increases and with it increases the area of the opening.
With the increase in the area of the opening amount of light also entering increases and visa versa happens on decreasing the aperture.
F-Stop
The f/stop regulates how much light is allowed through the lens by varying the size of the hole the light comes through.
The standard sequence of f/stops from f/1.4 to f/22. Typically the sequence is 1.4, 2.0, 2.8, 4, 5.6, 8, 11, 16, 22.
If you pay attention to the numbers you will notice each of the numbers in this sequence has a halving/doubling pattern of the amount of light from its immediate neighbours.
The reason behind this halving and doubling pattern is that f-stop is a ratio. It is a ratio is between the diameter of the aperture in the lens and the focal length of the lens.
If you know the values of both the focal length of the lens and the diameter of the aperture it is easy to calculate the f-stop.
Depth of Field
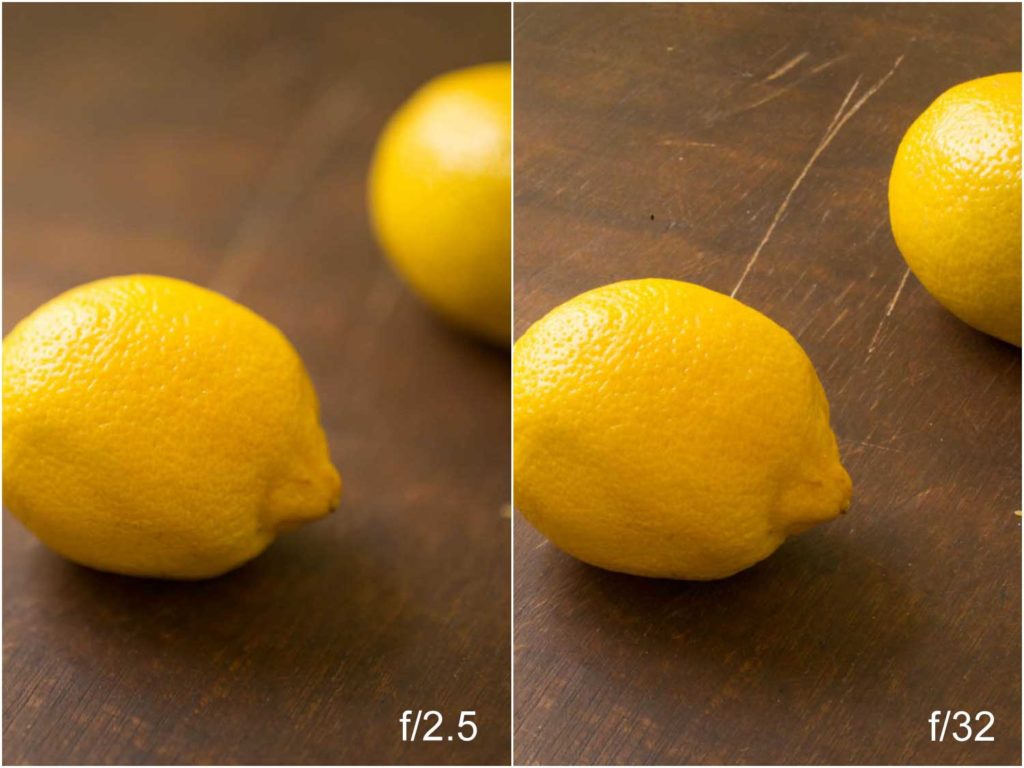
In simplest terms, depth of field is how much of your image is in focus.
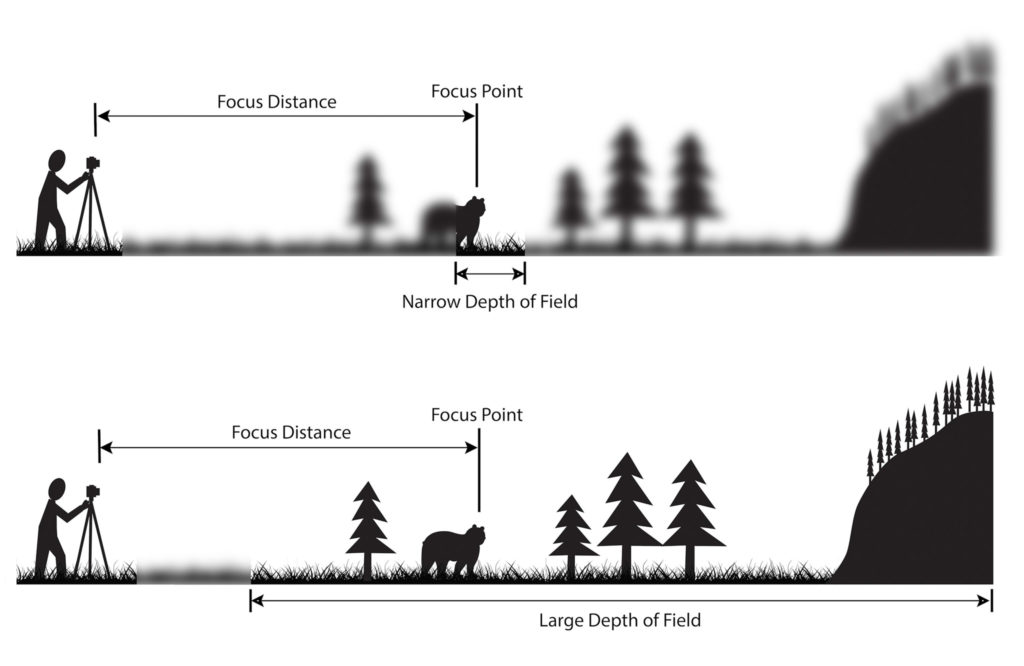
On the other hand, in more technical terms, depth of field is the distance in an image where objects appear “acceptably in focus” or have a level of “acceptable sharpness.”
Controlling the focus of a photo in photography is considered an important skill in photography.
Focus sometimes can catch the viewer’s eye. A properly focused picture can sometimes prove to be better than an edited picture.
The formula for calculating the approximate depth of field can be written below.
DOF= 2u²Nc/f²
Where for a given circle of confusion (c), focal length (f), f-number (N), and distance to the subject (u)
There are limitations to depth of field as well but these can be overcome by the use of various techniques and equipment.
Shutter-speed
As the name suggests shutter speed is the speed at which the shutter of the camera closes.
A fast shutter speed creates a shorter exposure which means the amount of light the camera takes in and a slow shutter speed gives the photographer a longer exposure.
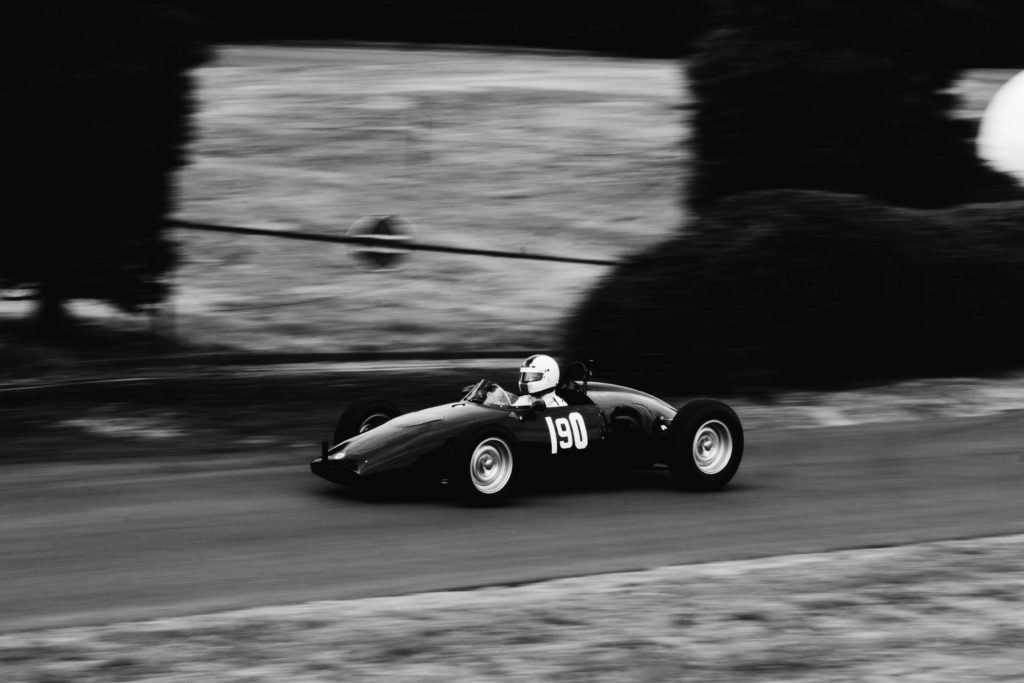
you can only take the above picture with a higher shutter speed
The field of mathematics used in shutter speed is fractions. Shutter speed is generally measured in fractions of a second when they are under a minute.
If you use an especially fast shutter speed (picture shared about), you can eliminate motion even from fast-moving objects, like birds in flight, or cars driving past.
If you use a fast shutter speed while taking pictures of water, each droplet will hang in the air completely sharp, which might not even be visible to our own eyes.
Most DSLRs available today and mirrorless cameras can handle shutter speeds of 1/4000th of a second at the fastest, while some can handle even quicker speeds of 1/8000th of a second and faster.
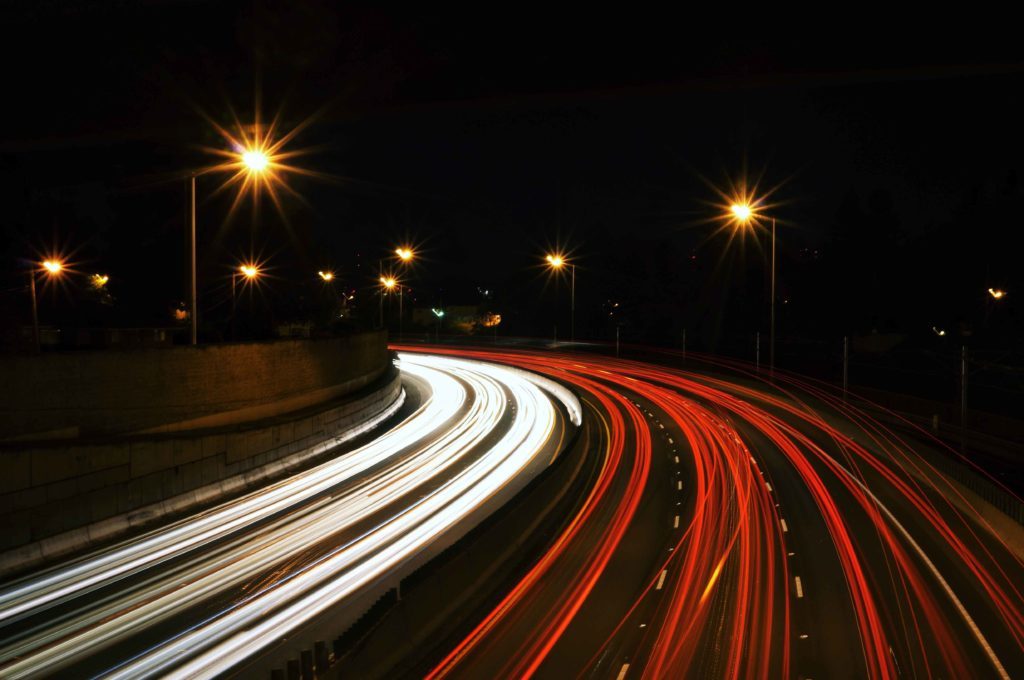
On the other hand, the longest available shutter speed on most DSLRs or mirrorless cameras is typically 30 seconds.
There is always an option to use a longer shutter speed by using external remote triggers, if necessary.
Shutter speed is one of the main components in photography like the aperture.
example of a slow shutter speed…
Composition
One of the main use of mathematics in the composition includes the rule of thirds.
The rule of thirds is used in composing visual images such as designs, films, paintings, and photographs.
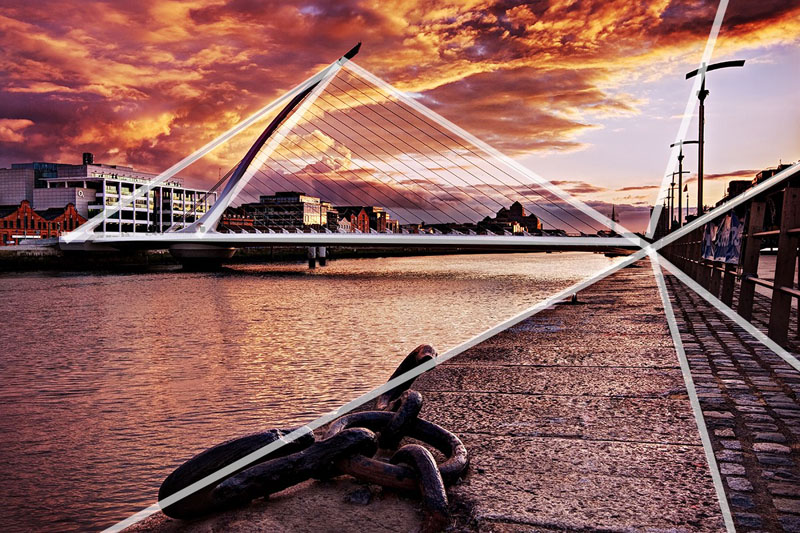
This rule breaks an image down into thirds that are both horizontal and vertical so you have nine pieces and four gridlines.
According to the rule, by positioning key elements along the gridlines, you’ll end up with better compositions.
To follow this rule, simply use the gridlines to position essential compositional elements.
Using the rule of thirds you can improve the composition of your photographs.
Not only is there the rule of thirds but there are many other rules involved in the composition.
- Vanishing Points in Photography | Composition Tips To Get Bangers
- A Beginner’s Guide to some of the best Photo Composition Techniques
White Balance
White balance is the measure of colour temperature, it can be cold or warm.
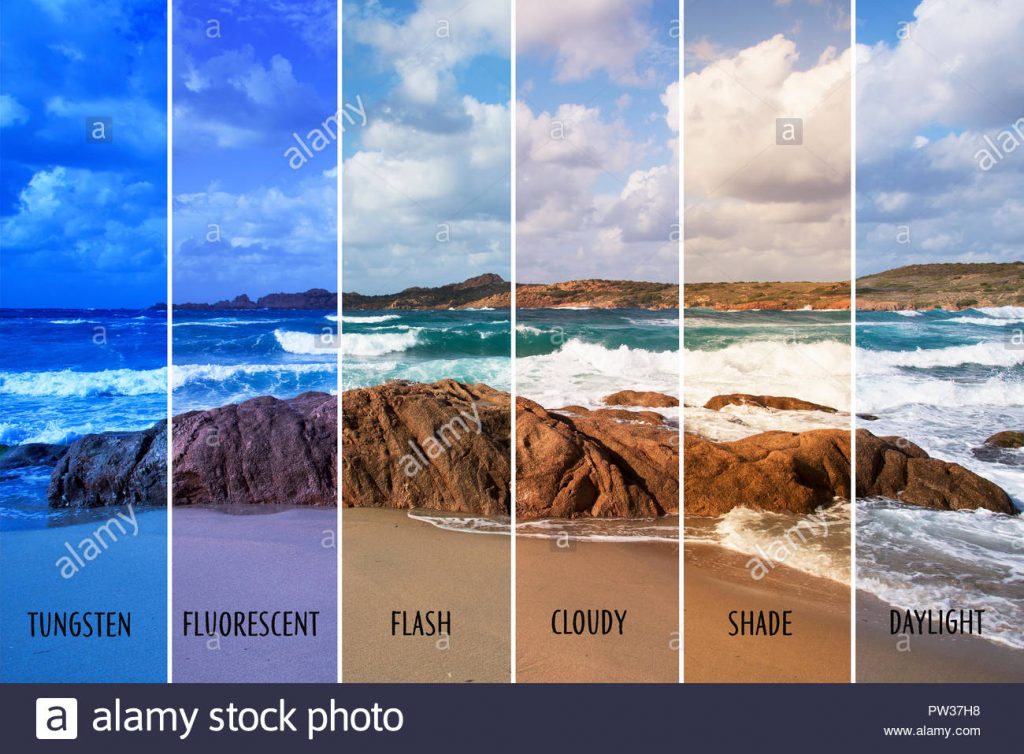
Sometimes due to the sunlight, you will notice a tone of orange in your photographs. To resolve this you can use the white balance.
There can be different temperatures of different light sources. You can use white balance to even out the effects like shade and other discolouration due to light sources.
The colour temperature is expressed in Kelvins (K), and there is a specific temperature scale which tells us what colours are warm and what are cool colours.
But in cameras there are no numbers for white balance there are other settings which involve Fluorescent, Cloudy, and Incandescent.
There are many options available to choose from, you can choose based on your environment and lighting conditions.
Conclusion
We have heard our elders say any kind of knowledge never goes to waste.
Well believe it or not it is true. In high school, we use to study trigonometry with a burden and a heavy heart.
We used to hate maths as a subject. But as we grew up most of us came to realize that maths was important to an extent.
Now if we talk about trigonometry, photographs are used to find the correct angle to click the memorable picture.
There are many more uses of maths in photography that are explained in the above article.
Some of the most important rules in photography use rations and many even use various equations.
As there is a famous quote that says “Without Mathematics there is nothing you can do.”
Everything around you is mathematics and for you to capture that you need mathematics, honestly no one ever wonders that we can use maths in photography to improve our photography skills.
But here we’re, hope you got to learn some new ways to improve your photography skills by using maths.
Read more
- 7 Secrets To Do Better At Photography | Improve Your Photography
- Most important ways to improve photography performance in 2024
- 17 Unique Photography Hacks To Know And Apply (With Example)
- What Is NFT For Photographers? Know Everything About NFT
- Canon vs Nikon In-depth Comparison | Find the Perfect one in 2024



 FREE Guide Revealed!
 Don't Miss Out The Opportunity To Earn as Photographer in this year :)
1 Comment