I love many different types of photography but like other photographers, I have a personal favourite which is portrait photography, I love to capture Portraits.
But without knowing some easy camera settings for portrait photography it’s very hard to capture what you imagine.
I know this feeling because when I was young I knew nothing about the camera settings required to capture portraits.
I just assumed the shot which I wanted to capture and started capturing.
And because of the wrong camera settings I never succeeded in capturing better portraits, that’s my story.
- checkout my new (sharpest) lens for portrait photography: Sigma 56MM F1.4
Apart from this, I saw many newbie photographers who love to do portrait photography but don’t know some easy settings to capture better portraits, and they struggle a lot.
Hence, if you’re a beginner or even a PRO and want to learn something new and interesting ways to do better portrait photography or want to know how to do portrait photography then this article is for you.
This article is for every photographer wanting to learn some quick camera settings for better portrait photography.
At the end of this article, you’ll get some tips for better portrait photography, so without talking more about it let’s get started…
The 5 Most Important Camera Settings For Portrait Photography
I personally used all of these tips to improve my portrait photography performance and refer to this further based on experience…
Before we start let me tell you something, to capture great portraits, first of all, you need good camera equipment without proper equipment you won’t be able to capture good-quality shots.
Here is the first and very important part.
1. Manual Mode
If you want to become a professional photographer then the manual mode is a thing you should know.
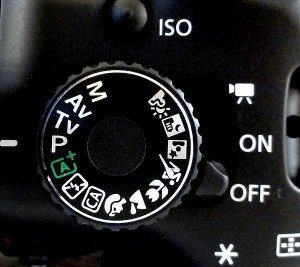
Without knowing the manual mode you won’t be able to shoot the image which you want to.
There are a lot of benefits you’ll get once you master manual mode.
You can capture images if there is low light or even if there is HARSH Sunlight using manual mode.
Apart from this, you’ll also learn how to use your camera to capture images in different scenarios.
- Know the difference between artificial vs. natural Light (examples included)
2. ISO & Shutter-speed
This helps you to capture better images in low light and if there is a good amount of light coming inside your camera.
So ISO and shutter speed is a part of some important camera modes like manual mode, creative auto & many more…
In short, to balance the light combination in your images, you need to use these two important features.
But if you don’t manage the camera setting combination for these two features then it’ll create some bad images with imbalanced lighting.
If you don’t know anything about ISO and shutter speed, then it’s better if you understand shutter speed and ISO and then start using them to capture beautiful portraits.
What if ISO is too high ??
Take this image as an example…
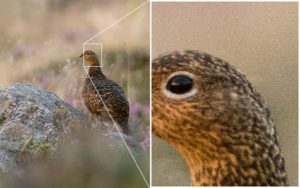
If your image contains an ISO of more than 1600 or 3200 then it’ll decrease the picture quality.
So it is better to make it your requirement to use ISO in-between 200 and 1600.
But wait if you manage the combination of shutter speed then you can increase your ISO.
Set it as low as possible between 100-400, and know WHY.
Because if your shutter speed is high like 1/1000 then your camera lens observes less light, so to add extra light you need a high ISO.
Which helps you to improve your picture quality.
example of shutter-speed

just downloaded this image from the internet, if you want to check out my images then you can see them on my Instagram Feed.
I took this image because it shows one part of shutter speed, which is called long exposure.
If you make the shutter speed of 10 or 20 seconds then you’ll get an image like that one.
But to manage better light combinations again you need to set low ISO ( 100-400 ), to make your image visible.
You won’t be able to capture this kind of portrait at night, but you can try Photoshop and create something awesome like this one…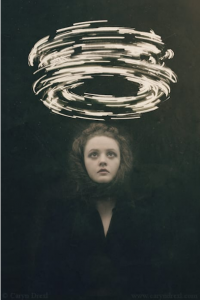
Credit: PhotoBlog
I read this stunning tip on DPS…
A general rule is to set your shutter speed two times the focal length of your lens.
For example, if you were using a 100mm prime lens, you would set a minimum shutter speed of 1/200th to avoid camera shake and image blur.
3. Shoot in RAW
There are many photographers out there, who don’t know why shooting in RAW is better than JPEG.
Some of them like to use RAW but because of camera memory issues ( RAW files are larger in size of memory than JPEG ), they start to capture images using JPEG.
If you don’t know, then you’re at the right place.

Let me give you an in-depth answer.
RAW files save every single detail when you capture an image, those details help you at the end when you’re editing your images.
So if you own a very high-quality camera, then just shoot one image with RAW and one with JPEG.
Then try to edit both of them in Lightroom, and you’ll be able to see the difference.
If you still want to know more about it, there here is a brief discussion on RAW vs JPEG.
Let’s move to another point…
Who doesn’t like to get a creamy bokeh kind of background effect while shooting portraits?
So the next two points are very necessary for you if you want a blurry background effect while shooting some high-grade portraits.
4. Aperture
The aperture is the thing that helps you to capture sharp as well as everything in focus kind of images.
To get started with aperture, first, you need to know something about aperture.
How does aperture work and what is aperture? if you don’t know then please read my article on 4 easy steps to understand aperture.
Now I can assume, you know something about aperture.
So to capture beautiful portraits you can set the aperture in between F/1.2 to F/3.
If you set your aperture between these ranges then you’ll get a very sharp foreground ( your model ) and blur/creamy background.
You can set the maximum aperture to keep everything in focus.
5. Manual focus
You can use autofocus to make your subject in focus but that is not the proper way to capture good portraits.
You can get better access to your photography when you start capturing images using manual focus.
When you try to an entry-level DSLR camera to capture some night photos, it takes time to detect the object with autofocus.
This can make you realize how important manual focus is.
It’s better to learn manual focus to get sharp images without spending more time just focusing on your subject.
The trick is to not focus on the model, focus on the eye of the model to capture sharp portraits.
That’s all the most important things you need to know before you start capturing good portraits.
Apart from this, there are many different things like camera equipment, lens & tripod, etc required to get better lighting and effect while capturing.
Make your histogram proper while you capture some great portraiture
My words…
I already mentioned what I learned to capture better portraits.
But apart from all these tips, I want to say something more important than that.
That is practice, always try to carry your camera with you and no matter what happens just capture every single moment.
For better creative ideas, you can just search on social media like Pinterest or Instagram to shoot better images.
And add your own creativity and shoot something different, this thing helps you to gain more confidence and makes you excited to capture more beautiful portrait shots.
May you like
- Headshot Photography: Easy Headshot Photography Tips To Remember
- Important photo editing tips for every photographer | Photo editing guide
- Cutest Newborn Photography Props | Photography Ideas included
Hope you guys like this article & learn some new camera settings for portrait photography, and some awesome tips to capture better portraits.
Have a good day, thank you 🙂
 FREE Guide Revealed!
 Don't Miss Out The Opportunity To Earn as Photographer in this year :)
1 Comment