Is Manual mode is the golden key to archive best photography skills ? or you can’t capture good photographs if you don’t know manual mode?
or some of the expert photographers say if you don’t know anything about manual photography then you don’t know photography !!! is that right or not?
if you are asking me about yes or no then it’s 50-50%.
you can capture good photographs using some other modes like Creative Auto, shutter-priority etc.
but if you learn manual mode then you can capture no matter what type of condition out there in this real-world un short you can capture anything.
Follow my Pinterest Boards to get the latest updates/reviews and news related to photography.
so if you are one of so-called ‘newbie‘ in this little photography world and want to know the real answer related to manual photography or manual mode then the next 5-7 min gives you proper knowledge and skills related to manual mode.
now without talking more about manual mode, let’s understand manual mode under the hood.
Beginners ‘Quick Guide’ To Manual Mode
To learn manual mode or any other thing, first, you must have a curiosity or a sense of excitement to learn any new thing.
Without these two things, you won’t be able to get the result that you really desire or imagine in your mind.
So before you learn manual mode, you just need to know why manual more is Necessary !!
Some of our readers may be asking me the same right now !!
Don’t worry, these bullets are too short and straightforward, “no more bullshits,” you know !!!
WHY manual mode
If you are a beginner and just purchased a new camera, then the manual mode is what you are missing.
By using this mode, you can learn a lot of new and interesting things, like
- how to use auto or manual focus.
- what is shutter speed?
- when to plus-minus ISO and aperture and lots of other factors.
know why manual mode is important
When to use manual mode ???
If you want to capture photographs the way you want or imagine, then you need to use manual mode, as simple as that.
where can I use manual mode ??
Almost everywhere, if there is too much light or too much dark or when you want to capture too quickly or too slowly at that time, you can use manual mode.
As you know this is a Quick guide so I don’t want to share some in-depth thoughts.
I have already given proper resources if you don’t know some concepts, then follow the links to learn more about it.
The Quick Guide To Manual Mode
It’s too boring if you learn the tough part first.
Hence, I divided this article into three subparts, each part contains some important features of manual mode.
The first one is too easy to learn, the second one is a little bit hard, and the third one is the hardest.
Don’t worry, if you just follow these steps and practice every single day, then this hardest part will also be easy for you.
But remember you need to practice a lot in order to reach a professional level and capture the images you imagine.
In this article, I used Canon 1300D (now I own Sony Alpha A6000 ), if your DSLR camera contains more features than this DSLR camera, then let me know in the comment section.
Stage 1
This stage includes some basic features of manual mode, so if you are aware of it, then you can just skip this stage and read stage 2 and stage 3.
some Easy features of Manual Mode
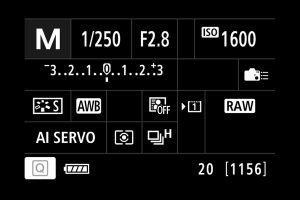
Picture Style
- To set some styles for your photo, you can use this feature.
- This feature contains styles like auto, landscape, portrait, standard, etc.
White balance
- There are lots of different options available in white balance.
- It’s like a different kind of filter.
- This feature contains filters like auto, Daylight, Shade, Cloudy, Tungsten light, White fluorescent light, flash, and custom
Find some good examples of white balance
Raise Built-in flash
- To on-off your camera flash, if you don’t have any external flash.
Flash Exposure Comp.
- If you are capturing photographs at night, then this feature is for you, using this feature, you get some options like (-2 to +2 ).
- If you set it to -2, then you get a dark type of flash, and if you set it to +2, then you get the too-bright shadow.
- Just capture some photos using this feature, and you’ll understand it quickly.
- This feature is also best while using the external flash.
learn how to use Flash Exposure Comp. in depth
Auto Lighting Optimizer
There are a total of five types of auto lighting optimizers available, disable, low, standard, and high.
If you want to know how this works “in short,” then it makes dark photographs into bright ones using these different options.
So set it as your requirement to capture good photographs.
Learn More About Auto Lighting Optimizer
Drive/ self-timer mode
-
- If you want to capture a family photograph including you then using this feature you can do it.
- This feature contains some other shooting modes like single shooting, continuous shooting, self-time – 10 sec or 2 sec, self-timer: Continuous
Too easy, huh !!! Now, let’s move on to stage 2.
Stage 2
ISO ( min 100 max 6400)
- When you get something very dark or bright, then using ISO, you can make it on one level.
- There are two parts of ISO, one is low range ISO(between 100-800) and another one is the high range ISO(between 800-6400).
- If you are capturing something very bright, then low-range ISO is the key to making your photograph good.
- Or if you are capturing something really dark, then high range ISO makes it bright using a range between 800-6400.
- So, in short, if you want to make your image brighter, then use High range ISO and the opposite for dark images.
But wait there is one problem: if you use more ISO, like 3200-6400, then it makes your photograph less sharp, so it’s not good.
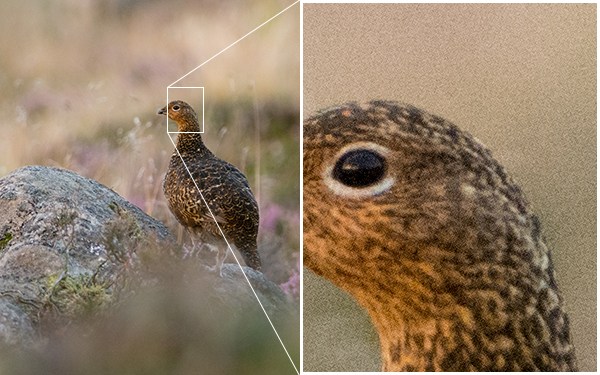
So always try to make ISO between 400-800 to capture sharp images.
Want to know more about ISO & Shutter-speed – learn ISO & Shutter-speed in Depth
Shutter-speed (slow – 30 sec, fast 1/4000)
- This is also one of the significant factors.
- If you want to capture too quickly or even if you want to capture too slowly, then using this feature, you can do it.
- In simpler language, if you want to capture any Moving car or any object that moves too quickly, then you can use this feature.
- Or even if you want to capture long exposure type of photographs, then you can use this feature.
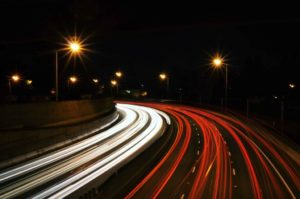
- Basically, this feature is called “Shutter + speed,” so set your speed to set the camera shutter.
- The range of this feature is from 30 sec to 1/4000 sec, which is way faster.
- One main thing about using this feature is that you can capture some awesome waterfall photographs.
Know 70+ different types of photography
Metering Mode
- There are three different types of Metering modes available in this camera, evaluative metering, Partial Metering, and Center-weighted average.
- All these metering modes are useful to meter the lights that camera through the lens into your camera.
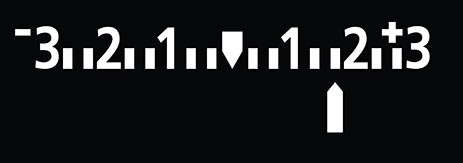
- If the light is too bright, then it goes “+” side, so now, when you capture any photographs, just see through your viewfinder to see that + pr – arrows at the bottom of your screen.
Know more about Metering Mode.
AF operation
There are three different operations available.
These only work while you are capturing photographs using autofocus.
One shot
- This operation is useful if you want to capture anyone moving subject.
Al focus
- Here, AI stands for (Artificial Intelligence), so basically, this AI gets the difference between your camera lens and subject.
- After getting the perfect result, it’ll capture sharp photographs.
- This feature is useful if that particular subject is staying in one position and ready to move.
AL servo
- This feature is useful if your subject is moving too quickly.
- It’s really hard to capture moving photographs using this feature.
- I tried this thing with my Canon 1300D and it’s not working properly(AI focus also), so if you have good lens then you can try this technique.
I found one interesting video related to this topic if you want to know more about this operation then watch this video.
May you like this
- Some Awesome Photography Hacks to impress your Friends
- 7 Crazy Photo Editing Apps you need to know to grow your Instagram
Stage 3
Aperture
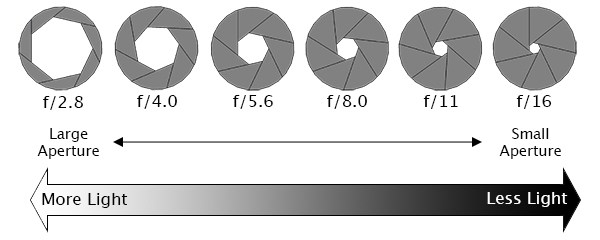
- Essentially, we count aperture in F steps, range: f/2.8 to f/16 (for entry-level DSLR camera).
- In one of my articles, I said, ” The aperture is the size of the opening in the lens through which light is allowed to pass whenever the shutter is opened – the larger the aperture, the more light passes through.“.
See this image to know more…
Know What is Aperture in depth
AWB
- This is also one of the most important topics, which makes the manual mode a little bit harder.
- Primarily, AWB stands for Auto white balance.
- The Auto White Balance (AWB) setting helps your camera “guess” the best option or choose the one closest to what your eyes might see.
- As we know our eyes can see even better than a camera lens, so if you want to capture something awesome (which your eyes can see) with your camera then you need to use AWB.
- This feature sets automatic white balance, and hence the name AWB.
see how it works and when you can use AWB
Image Quality
- These things matter if you want some quality in your photographs.
- There are lots of other types of Photo size are available when you check out manual mode.
- Every single photo size takes a different amount of MB to store photos on your memory card, by default, it’s JPEG.
- One suggestion – if you own 16GB or more then 16GB memory card then select photo size “RAW”.
- There are a lot of factors available that make your photo quality far better when you select RAW type.
Know Why RAW Image Quality is 10x better than JPEG (for only professional Photographers).
One BIG Bonus for you
Now you know something about manual mode, so it’s easy for you to master your DSLR camera, find the best guide to master Your DLSR camera within 15 Min with good Examples.
Now, I hope you know why manual mode is so important, If you practice more and more than one day, you will definitely master it. Thank you.

 FREE Guide Revealed!
 Don't Miss Out The Opportunity To Earn as Photographer in this year :)
No Comments