Long Exposure shots are unique and are different ways to express your photographs.
I love to do night photography, especially while shooting long exposures.
But as you know, long exposure works in low light because you need to set your camera for some seconds to capture better long-exposure shots.
As you also might know, the more light comes into your camera sensor, the more overexposed the image you’ll get.
So, do you know how to do daytime long exposure??
Yes, we can use some good ND filters to get some cool daytime long exposure shots, but without ND filters?
That’s kind of impossible, right??
Hmmm, I have some solutions that help you to shoot long exposure shots during the daytime.
So, if you want to save money or if you’re a student who doesn’t have enough money to buy ND filters, then this is the article that you’re looking for.
Now, without further ado, let’s get started.
How To Do Daytime Long Exposure Without ND Filters
Before you get to know the secret, let me share some good tips to capture better long-exposure images.
Things to remember before a shoot
Here are some important things that you need to know and use if you want better results in your long-exposure images.
1. Tripod
A tripod is an extremely important part of your first long-exposure photography class.
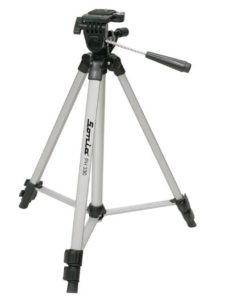
Because if you don’t use a tripod, then you won’t be able to stabilize your camera for more than some seconds.
This instability can give you very bad results and effects on your pictures.
So it is kind of important that you get a steady tripod or any stand to capture better long-exposure shots.
Now, let’s move on to another topic…
Know the meaning of the exposure triangle.
If you don’t know the meaning of the exposure triangle, then you’re wasting your time on long-exposure photography.
If you want to excel in long-exposure photography the exposure triangle is basic knowledge that you need to know about.
Without learning about this term you will not be able to properly capture long exposure shots and get the desired results.
So first, let’s understand the exposure triangle…
The exposure triangle is the combination of three different photography terms that you must know if you’re shooting manually.
These three terms include ISO, shutter speed, and aperture.
If you can manage these three things to capture one single perfect image, then you can capture images anywhere in any condition no matter whether it’s daytime or night.
So, if you don’t know anything about these terms, then you need to learn them or at least understand them properly.
Here are some useful resources which help you to understand this thing easily…
Learn manual focus
This is also an important part of capturing better shots generally, not only for long exposure.
But if you want to capture portraits, sports or street photographs, etc, then for better and sharper results, manual focus is an important mode.
By using the manual focus, you can manage to focus on your subject in just a second.
So, congratulations I think you know almost every single detail to capture better long-exposure shots.
Now, without taking more time, let us know our camera settings for daytime long exposure shots.
Settings for better daylight long exposure shot
These points are only important if you know the main features of your camera, which I told earlier in this article.
So you need to do enough exercise in order to master them.
Before you shoot, remember these points…
As we know, this article is to shoot daylight-long exposure images.
For this, we need to set our ISO minimum as possible ( ISO 100-300 ).
Also, if we want the foreground and background all in sharp, then we need to set the aperture to max ( around f/22 to f/24 ) this means your camera lens is able to capture all things without any issue.
The third and most important thing to remember…
Use manual mode while capturing long-exposure photography.
This mode gives you full access to change any camera setting that you like or which is required for that particular situation to capture better shots.
Here are some optional things that you can use to perform better in long-exposure photography.
You can use a remote shutter if you have the budget.
This kind of remote can help you to shoot for more than 30 Sec because almost all the camera comes with MAX 30 seconds of exposure.
Using a remote shutter, you can increase those seconds ( using BULB mode ).
Where you need to press the shutter button, In BULB, the shutter is open as long as you press the shutter release.
So, it makes it easier to manage all that stuff with a remote shutter and can result in better image quality.
Now let’s get back to the main point…
Ways to do Long exposure shoots without ND filters
I found a total of two different ways to do daytime long exposure without the ND filter.
- Using your camera settings
- Use Photoshop
Let’s understand the first method…
Camera settings
These camera settings are available on almost every intermediate camera available in the market.
If your camera does not contain this mode, then you need to upgrade your camera, or you can choose another option.
Now, let’s find out whether your camera contains that mode or not.
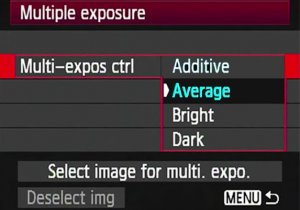
If you’re a Canon user, then on your camera settings, set Multiple exposure controls to Average.
But if you’re a Nikon user, then check for Multiple exposure mode in your camera settings, and just turn that on.
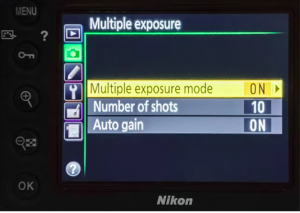
That’s all you need to do, all the other things will be handled by your camera itself
what happens behind the scenes…
So when you set multiple exposures for average, then it’ll capture one single image in a different period and it’ll give you the combined result as one single image.
If you set your shutter speed to 1/4 sec, then using this mode, you can get a shot of 1/4 * 4 ( total 4 shots ), which is combined as one single shot.
That means you’ll get a very quality image plus long exposure shots in the daytime.
Let’s move on to another technique…
Using Photoshop
This trick is very common and anyone can use it, the only requirement is proper knowledge of Photoshop or any other post-processing software.
But if you don’t have that much time, then you need a perfect video that explains the proper steps to archive the image that you want.
Also, you need a good PC to run Photoshop, so do remember this thing.
Steps to do a long exposure with Photoshop in the daytime…
I am not explaining everything, but I want you to understand the process which gives us the final result.
This process includes the following steps…
- Capture long exposure shots using a tripod ( just follow the settings that I suggested earlier ).
- Capture at least 20-30 photos using a shutter speed of 0.5 and ISO as low as possible.
- That’s it, your work is done.
Now you can just copy and paste your bunch of images into one single folder.
You can even open Photoshop and merge a bunch of images in one single image it( may take some time to manage all the stuff together ).
Don’t know how to do that? No worries, I found one good video which helps you to get your final image.
Hope you guys learn something new and important from this article.
 FREE Guide Revealed!
 Don't Miss Out The Opportunity To Earn as Photographer in this year :)